How to Run a Raspberry Pi Cluster with Docker Swarm

Share
What you'll need
Interests


A cluster is a group of computers performing the same task, operating as a single system. Although Raspberry Pi’s are pretty incredible devices, a single Pi can only do so much.
A Raspberry Pi cluster can be used anytime you want to improve performance or availability, and there are many use cases including serving web content, mining cryptocurrency, processing large amounts of data (using tools like hadoop), and much more. This guide will show you how to run a Raspberry Pi cluster using Docker Swarm.
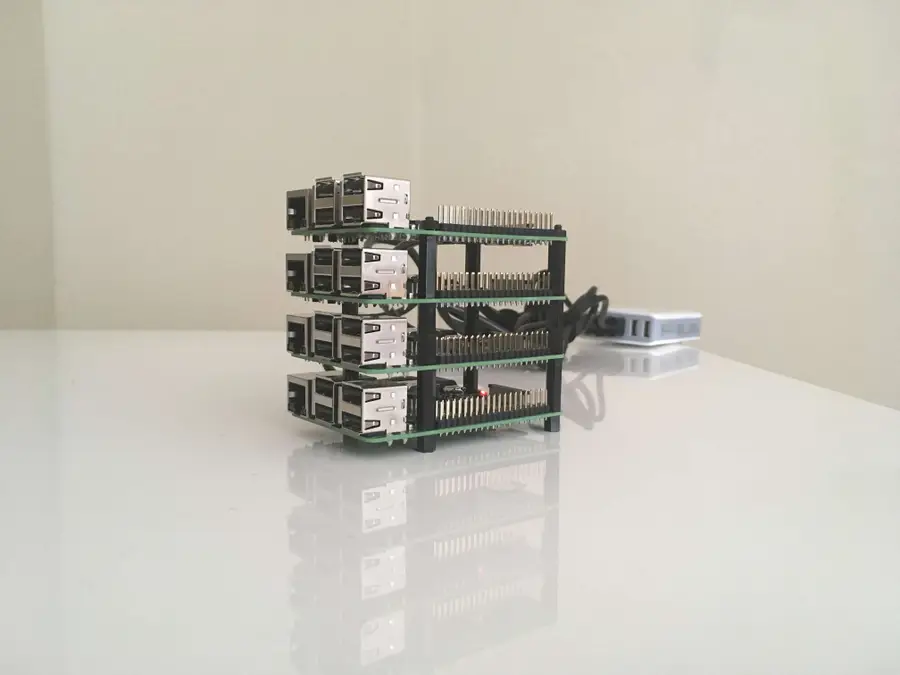
1 – Build your tower

This is fun part.
You don’t actually need a tower, but you might as well build one. Using a tower like this makes everything more organized and easier to work with.
2 – Install Raspbian Jessie on all four SD cards
We’ve written a detailed guide that will walk you through the process of installing Jessie on your Raspberry Pi. Since we’re dealing with multiple Pi’s, you’ll have to do this for each one.

Note: For each Pi we’re going to do some configuration while the SD card is in your computer. So read the next step to see what to do after installing Raspbian on each SD card.
3 – Configure Raspbian from the SD card
After installing Jessie, and while the SD card is still in your computer, we’re going make a few changes to the configuration. Follow the links in this step for detailed instructions on each change.
First, go ahead and enable SSH.

How to Enable SSH on Raspberry Pi OS Without a Screen
The SSH protocol is disabled by default.
Then set up WiFi for the Pi.

How to Set up WiFi on Your Raspberry Pi Without a Monitor (Headless)
No monitor, keyboard, or mouse? No problem.
Once you’ve installed and configured each SD card, insert one into each Raspberry Pi.
*Protip: Once you’ve configured one SD card, you can use a utility such as ApplePi Baker to clone it onto the other SD cards.
4 – Power up and test
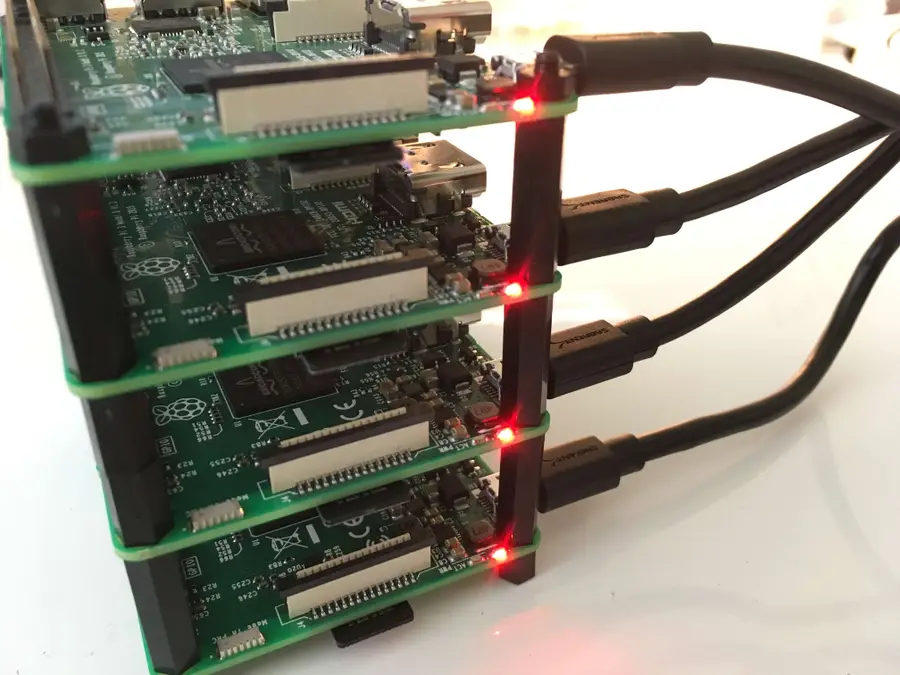
Connect your Raspberry Pi’s to their power supplies, and make sure they boot properly. Near the USB connector, you should see a solid red LED. This indicates that the Pi has power. Then you should see a green flashing LED, which indicates there is SD card activity.
5 – Find the IP address of each node
We’ve written a guide that shows you how to find the IP address of your Raspberry Pi. So follow this guide if you need more detailed instructions, but we’re going to use nmap.

sudo nmap -sn 192.168.1.0/24Note: You might need to use a different subnet range. Follow the guide for more information on finding the correct subnet.
This will list all of the devices connected to the network, so we should see all four of our Raspberry Pi’s. When you spot them, take note of the IP address for each. Here is my output:
Starting Nmap 7.40 ( https://nmap.org ) at 2017-03-21 15:52 PDT
Nmap scan report for Chromecast.attlocal.net (192.168.1.78)
Host is up (0.063s latency).
MAC Address: 54:60:09:06:76:0A (Google)
Nmap scan report for unknownc24b2b235d18.attlocal.net (192.168.1.178)
Host is up (0.0059s latency).
MAC Address: C2:4B:2B:23:5D:18 (Unknown)
Nmap scan report for raspberrypi.attlocal.net (192.168.1.181)
Host is up (0.29s latency).
MAC Address: B8:27:EB:79:49:F2 (Raspberry Pi Foundation)
Nmap scan report for raspberrypi.attlocal.net (192.168.1.183)
Host is up (0.17s latency).
MAC Address: B8:27:EB:95:6D:7A (Raspberry Pi Foundation)
Nmap scan report for raspberrypi.attlocal.net (192.168.1.184)
Host is up (0.22s latency).
MAC Address: B8:27:EB:6E:DE:EF (Raspberry Pi Foundation)
Nmap scan report for raspberrypi.attlocal.net (192.168.1.185)
Host is up (0.22s latency).
MAC Address: B8:27:EB:B6:4A:6E (Raspberry Pi Foundation)
So the IP addresses for all four of my Raspberry Pi’s are:
192.168.1.181 192.168.1.183 192.168.1.184 192.168.1.185
6 – Change the hostname for each node
For each Raspberry Pi (node) in our cluster, I’m going to change the hostname so it’s easier to access. Since I’ve got four nodes I’m going to name them docker1, docker2, docker3, and docker 4.
Follow this guide to learn how to change the hostname of your Raspberry Pi.
You’ll also want to add an entry in your local /etc/hosts file that maps the new hostname to the IP address for each Pi. The end of my /etc/hosts now looks like this:
192.168.1.181         docker1
192.168.1.183         docker2
192.168.1.184         docker3
192.168.1.185         docker4
7 – Copy SSH keys to each node
This step is optional, but it will allow us to easily SSH into each node without using a password. I’ll use the ssh-copy-id command to copy my public key to the remote server.
If you don’t have a key generated already, you can do so with:
ssh-keygen -t rsaHit enter twice and leave the passphrase empty (unless you really want to use a passphrase).
Then copy the key to each node with:
ssh-copy-id pi@docker1You’ll have to enter your password to copy the key. Do this for each node.
8 – Install Docker on each node
You can use this simple bash one-liner to install docker on each node.
for host in docker1 docker2 docker3 docker4; do ssh pi@$host curl -sSL https://get.docker.com | sh; doneOf course, you’ll have to use your own hostnames, but this should loop through each host and install docker. For more detailed instructions on how to install Docker on your Raspberry Pi see this guide.

9 – Create the swarm
Now that Docker is installed we need to create our swarm. We only need to do this on one of the nodes. So the order of operations will be: 1. create swarm on a single node (this node will be a manager node), 2. join one more node as a manager, and 3. join two more nodes as workers. So we’ll have a total of 2 managers and 2 workers in our swarm.
So in this step, I’ll create the swarm on docker1.
To do this, we’ll first have to get the IP address of the node. If you’re following this guide step by step, we already have the IP address in our local /etc/hosts file. If not, you can use this guide as a reference.
For me, the address of docker1 is 192.168.1.181. So I’ll use this command to create the swarm:
ssh pi@docker1
sudo docker swarm init --advertise-addr 192.168.1.181
You’ll notice that this outputs a command that can be used to join other nodes to the swarm as a worker. The command looks something like this:
docker swarm join \
        --token SWMTKN-1-49nj1cmql0jkz5s954yi3oex3nedyz0fb0xx14ie39trti4wxv-8vxv8rssmk743ojnwacrr2e7c \
       192.168.1.181:2377
Keep track of this command. Although you can regenerate a token if necessary, we’re going to use this in the next step.
Now we’ve got our swarm with one manager node. You can confirm by typing:
sudo docker node ls10 – Add the rest of the nodes to the swarm
Now we’ve got to add the rest of the nodes to the swarm. As I mentioned in the previous step, we’re going to add one more manager and two more workers.
Let’s start by adding our next manager node on docker2. To do this, we’ll have to generate a manager token. While still logged into docker1, type:
sudo docker swarm join-token managerThis will generate another join command like the one from the previous step. So we’ll grab this command, ssh into docker2 (from our local machine), and use the manager join command.
ssh pi@docker2
sudo docker swarm join --token SWMTKN-abc...manager...xyz 192.168.1.181:2377
Keep in mind that the two swarm join commands look similar, so we’ll have to keep track of which is which. We just joined docker2 to the swarm as a manager, so now we’ll use the other token and join docker3 and docker4 as workers.
ssh pi@docker3
sudo docker swarm join --token SWMTKN-abc...worker...xyz 192.168.1.181:2377
And again from your local machine:
ssh pi@docker4
sudo docker swarm join --token SWMTKN-abc...worker...xyz 192.168.1.181:2377
Now all of our nodes have joined the swarm. Let’s run our node ls command again to confirm.
ssh pi@docker1
sudo docker node ls
And you should see all of the nodes listed:
7x52m1rsps550g89n1zngqqw2    docker4   Ready   Active
nck7h1z5ka7q5x05ek73iw3p2    docker3   Ready   Active
q0p4wnzs9wg58yj8m10fk41t3 *  docker1   Ready   Active        Reachable
tunc46ypfdl9uhvin4g4ofddz    docker2   Ready   Active        Leader
11 – Run our first service
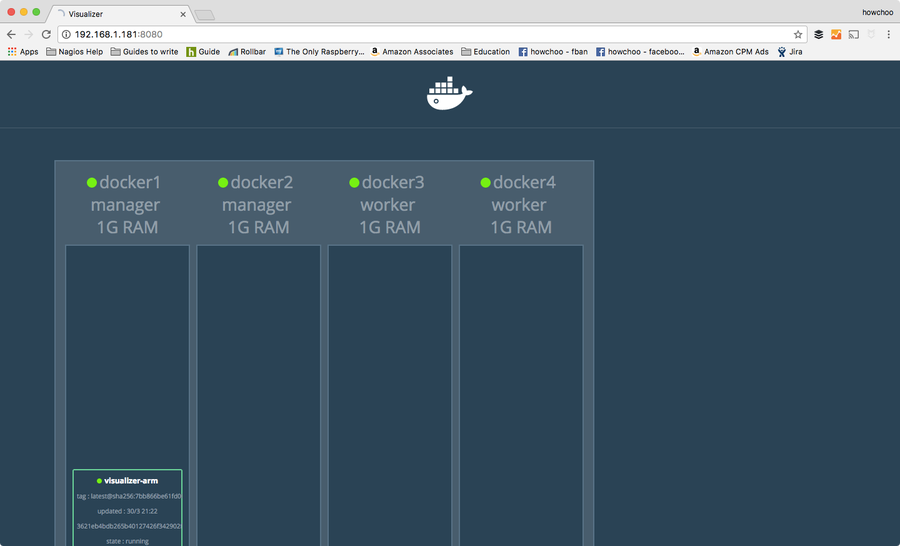
At this point we’ve accomplished the purpose of the guide, but we might as well run a service to demonstrate how to use the swarm. Our swarm can run any number of services and they can be scaled and distributed across the nodes in our cluster according to our preferences. To begin, we can run a visualizer service that will provide a web interface to visualize how the containers are distributed across the swarm.
This service is built from an image called “visualizer” originally created by Github user ManoMarks. But we’ll have to use a version of this image that was built to work on the Raspberry Pi and other ARM devices.
So let’s log on to docker1 and create our visualizer service:
ssh pi@docker1
sudo docker service create \
        --name viz \
        --publish 8080:8080/tcp \
        --constraint node.role==manager \
        --mount type=bind,src=/var/run/docker.sock,dst=/var/run/docker.sock \
        alexellis2/visualizer-arm:latest
This will probably take a few minutes to spin up because it has to download the image. We can check the status by typing:
sudo docker service lsUntil the service is ready, you’ll see the REPLICAS value as 0/1.
lqejzqrv0le8 viz replicated 0/1 alexellis2/visualizer-arm:latestIt will say 1/1 when it’s ready.
Once it’s ready, you can visit http://192.168.1.181:8080 (the IP of docker1 and port 8080). This will show you a nice visualization of the swarm and which containers are running on which nodes.
Of course, for your purpose you’ll be creating at least one other service. There is a lot of pertinent information about docker that won’t (and can’t) be covered in this guide, but check out the official docker documentation for more information and of course check out the Docker interest on howchoo.


