Amazon Wedding Registry – Everything You Need To Know

Share
What you'll need
Interests
Posted in these interests:

Wedding planning can be stressful, but for many, creating the registry is actually fun. After all, it’s one of the only parts of the wedding where you get free stuff, rather than paying an arm and a leg. In this guide, we’re going to cover everything you need to know to create an Amazon Wedding Registry for your wedding.
In the days of old, you’d have to go to a physical store (like a caveman), register in person, and then take a scanner around and scan the products you want to add to the registry. I’m sure this is still possible, but in the days of Amazon, you can create and manage your registry from your couch. Laziness aside, there’s something like half a billion products listed on Amazon, so you can create a single registry with just about anything you could think of.
What is a registry?
In many cultures, it’s traditional for wedding guests to bring a gift for the bride and groom to the ceremony. And oftentimes, the gift is intended to be something useful for the couple as they’re starting their life together. The wedding registry has developed as a way to organize this process both for the couple and for the guests. A registry is a service provided, usually by a retailer, that allows couples to compile a list of products that can be easily distributed to their guests. This lets the guests know what items the couple need (or desire), and whether or not they have already been purchased by someone else.
Amazon, the world’s largest (by far) online retailer, provides a registry service with a lot of great features that we’ll explore throughout this guide.
How does an Amazon Registry work?
Once you’ve got a registry set up (which we’ll cover later), you can browse Amazon and add products to your registry directly from the product pages. If you happen to want a product that isn’t listed on Amazon, you can still add it using the Amazon Assistant extension.
Once your registry is created, your friends, family, and other wedding guests will be able to browse your registry to easily buy the products you requested. And if the guest purchases the product from Amazon using your registry, the registry is updated, marking the item as “Purchased”, thus avoiding duplicate purchases. So you don’t have to worry about getting 13 toasters!
Why use Amazon for your wedding registry?
Besides the benefits we’ve already mentioned, there are many great Amazon registry features that you can explore here. I’ll also highlight a few of my favorites:
- You get a one-time discount of 20% off on anything left in your registry after your wedding. That’s kind of huge. You can add big-ticket items that you know your guests might not purchase just to get the 20% off discount.
- With Amazon, you have everything “all in one place”. This can save a lot of time and effort.
- Also, most people have a Prime account. So not only is it easier for you, it’s easier for your guests.
- Oftentimes, guests can’t attend the wedding but still want to send a gift. Again, Amazon is probably the lowest-friction way to facilitate this.
If you’re ready to create your Amazon wedding registry, keep reading. The rest of this guide will show you how to create and manage your registry in only a few minutes.
1 – Sign up for an Amazon Account
Before creating a registry on Amazon, you need an account. While an Amazon Prime account isn’t required to create a wedding registry, if you don’t yet have it, you should see if you qualify for a free Amazon Prime account.
2 – Create a registry

- Go to the Amazon Wedding page, and click Create Your Registry.
- Sign in, if required
- At this point, you’ll be guided through a form to describe your wedding. I won’t list each step here because it’s fairly self-explanatory, and the form is likely to change subtly over time.
- Once you’ve completed all of the steps, click Create your registry. Now you’ve got a registry, and you can start adding products!
Tips
Public vs. private registry
During the creation process, you’ll be able to choose whether you want to create a public or private registry. Obviously, you’ll need to set the registry to public in order for guests to see it, but you might want to set it to private while you’re building it. Then when you’re satisfied, you can change privacy settings in the Settings page.
The Settings page offers three privacy options:
- Anyone can see the registry (public)
- Only people with the link can see it
- Only registrants (you and your spouse-to-be)
Also, if you’re using The Knot for wedding planning, you can choose to make your registry searchable on The Knot’s website.
3 – Manage your registry
Add gifts to your registry
If there’s one thing Amazon is good at, it’s showing you products you’re likely to want. When you click Get started, you’re taken to a page with recommended products, and there’s even a Gift Advisor that will help you plan. You can easily add recommended products from this page.
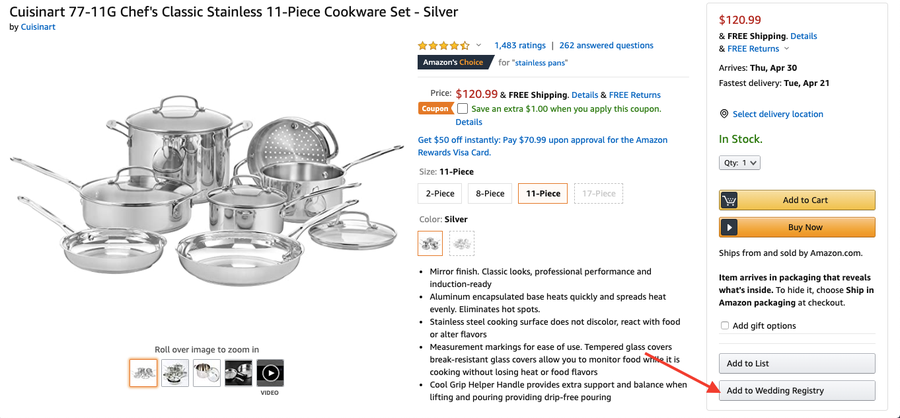
However, you’ll likely want to search for specific products. You can also use the search bar to find products and add them from the product page. Go through the same steps that you would if you’re buying a product, but instead of clicking Add to Cart or Buy Now on the product page, click Add to Wedding Registry below.
View your registry
At any time, if you want to view all of the products in your registry, you can click on the Account dropdown and select Wedding Registry under the Your Lists section. This will take you back to the “Gift Advisor”, and you can click “Your Registry” to see the products in your registry.
Delete items in your registry
From the Your Registry page, find the product you want to remove and click Edit Item. Then click Remove Item.
4 – Share your registry with family and friends
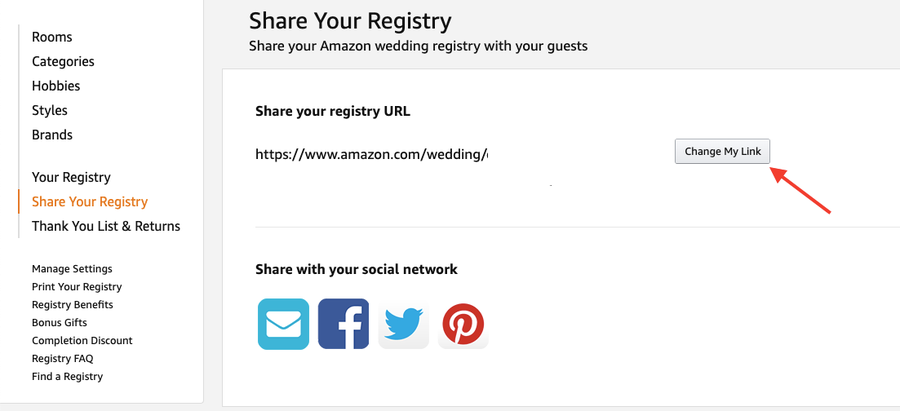
From the “Gift Advisor “ or “Your Registry” page mentioned in the previous step, click “Share” in the top menu. This will take you to a page with sharing options.
Share the registry URL
On this page you’ll find your registry URL. This is a URL that can be sent to friends and family via email, text, or can be included on the invitation.
Change your registry URL
You might notice that the registry URL is long and unattractive. You’ll probably want to change your registry URL to something a little “cuter” 🙂 To do so, click “Change My Link” next to the URL. This will give you the opportunity to use something shorter, easier to read, and easier to share. This is especially important if you’re going to include the URL in a written invitation.
5 – Delete your registry
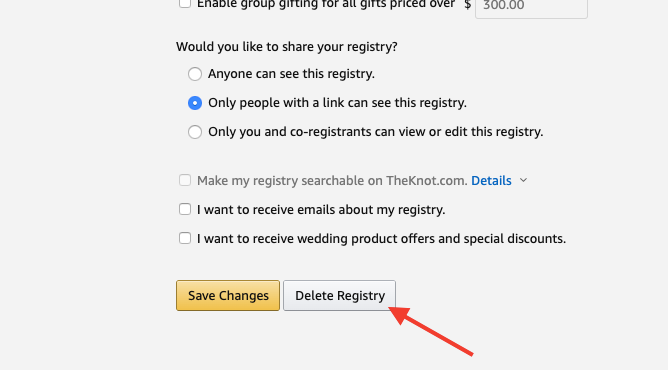
At some point, you’ll likely want to delete your registry. To do so, you can click “Settings” from the registry page. On this page, you’ll find a number of configurable registry settings, and at the bottom you’ll find a button that says “Delete Registry”.
Click the button, then confirm. Your registry is history!


