30 Amazing Things You Didn’t Know Your iPhone Could Do


Share
What you'll need
Interests


Most iPhone users use their iPhones everyday without accessing all of its capabilities. We often hear about “hacks” that allow us to use our iPhones in ways we never thought of before, but many of them tend to be impractical or overly complicated for everyday use. As a long time iPhone user and Apple enthusiast, I have learned about hidden iPhone features, shortcuts, and tricks over the years that have helped me to get the most out of my iPhone and simplify my daily routine, while still being practical for everyday use.
Here are my Top 30 iPhone hacks, tips, tricks, and features that you probably haven’t been using yet, but should be.
Disclaimer: Depending on your iOS version, some of these features may not be available to you. In order to be able to use all of these features, make sure you have updated to the latest iOS.
1 – Create amazing text effects with your iPhone
You know how when you type “congrats” in Messages the entire screen fills up with confetti? Well, the effects don’t stop there! There are many text effects within the Messages app. Here are just a few of the many:
How to create bubble effects with iPhone
Slam, loud, gentle, and invisible ink effects
Bubble effects are some of the simpler and very self-explanatory effects that impact the message bubble itself. When the message bubble pops in on the other person’s message thread, they will see it slam, gently swell, or will have to erase away the sparkling image to reveal the message.
To use one of these effects, you: – Type your message. – Press and hold the arrow used to send the message – Choose from one of the bubble effects above.
How to create screen effects with iPhone
echo, spotlight, balloons, confetti, love, lasers, fireworks, and celebration
Screen effects fill the entire iPhone screen and, depending on the effect, can impact the bubble as well, like the congrats effect mentioned above.
To use one of these effects:
- Type your message.
- Press and hold the arrow used to send the message
- Click the screen option at the top of the screen.
After choosing your desired effect, you will then click the send arrow again.
Phrases that Create Effects on iPhone
- Pew Pew triggers the spotlight effect.
- Congrats and Congratulations trigger the confetti effect.
- Happy Birthday triggers the balloons effect.
- Happy Chinese New Year triggers the celebration effect.
- Happy New Year triggers the fireworks effect.
2 – Use timed music to wash your hands correctly with iPhone
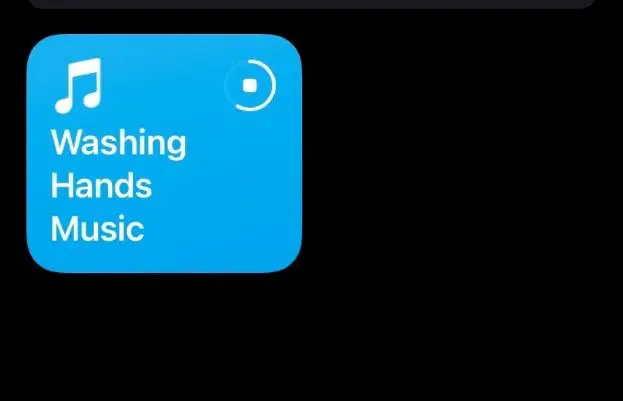
During the Pandemic, we have all become more cautious than ever about handwashing. With kids, it can be difficult for them to know how long they really should be washing their hands. This feature is great, because it will play music from Apple Music for the time equivalent that’s been recommended (20 seconds) and makes handwashing a bit more fun.
How to set up the timed hand washing feature on iPhone
To set this feature up, go to Shortcuts and click the Washing Hands Music shortcut.
It practically sets itself up. You only have to add the shortcut and allow it to use the Apple Music app. When the time comes is ask Siri to “Play Washing Hands Music,” so that you stay hands-free.
| 🛈 In order to use this Shortcut, you must have the Shortcuts app. If you have offloaded it, you can just redownload it in the App Store. |
3 – Have Siri call you by a nickname
While this isn’t necessary for everyone, some people prefer to go by a name other than the one that is listed for their Apple ID. Since Siri uses your Apple ID and contact information to refer to you by name, Siri will always call you by the name shown there unless you change it or create a nickname. Maybe you have gone by another name your entire life, or just don’t like your given name.
Either way, this trick allows you to change the name Siri will refer to you by, making it much more personalized.
After you say, “Hey Siri,” just tell Siri “Call me by a nickname.” Siri will then ask you what you would like to be called, and you can state the nickname. Siri will confirm the pronunciation, and then you are good to go!
4 – Create custom vibrations on your iPhone
For those who love to customize their iPhones, this feature has been hiding in wait for you within your Sounds and Haptics settings. Just like having customizable ringtones, you can also customize your vibrations. What’s even better, you can actually create the beat of the vibration to match your favorite song or rhythm. Mine is my favorite song by The Lumineers.
How to create a custom vibration on your iPhone
To create a custom vibration:
- Go to Settings
- Select Sounds & Haptics
- Select which use you want to vibration for (ringtone, text tone, alerts, etc)
- Click Vibration
- Scroll down and click Create new vibration
You will then tap your pattern onto the screen. If you want to review it, you can play it to review, and then click Save.
5 – Siri shortcut to app-specific settings
By far, my favorite iPhone tip is using Siri to get to my app-specific settings.
Imagine you are in the middle of playing one of those totally awesome free mobile games, and you realize that you need to turn your cellular data on to keep playing the game, or you are in the App Store and want to turn on App Updates so your apps automatically update for you. You can quickly get to the app-specific settings from within the app without having to go to the home screen and search for the settings app, scroll until you find that app, change the setting, exit settings, and go back to the previous app. After all, one of the perks of owning an iPhone is convenience, right?
Here’s how to do it: with the app still open, press the home button if you have one, or say “Hey Siri,” and when Siri pops up, say “Settings.”
Siri will take you to the settings for that particular app. You can then change the setting you needed to change and go back to whatever you were doing before. Quick, simple, and time-saving!
6 – Use your iPhone to hang pictures

I have an extensive collection of picture frames and a collage of them behind my couch. About a year ago, I moved and I had no tools to hang up my pictures. No hammer. No level. Just the frames, pictures, and the nails I originally hung them with.
After getting very creative with what to use for a hammer, I used my iPhone to make sure all of my photos were level. When you are trying to put a collection of photos or art, in one place, it’s also nice to use the Measurement app to measure each photo or item so that you can space them properly.
How to level things with your iPhone
Don’t have a level, no problem! Just use your iPhone. It can be used as both a level and a measurement tool for your pictures, tables, and décor.
To make sure a photo is level, open the measurement app, click level at the bottom of the screen, and set the phone horizontally on your photo. If it can’t be set on top of the photo, align the white line at the top of the screen with the top of your photo.
How to measure with your iPhone
To measure, open the Measurement app > click Measure > and follow the measurement from corner to corner to get an accurate measurement of the item.
7 – Set your iPhone to erase itself when someone is trying to break in
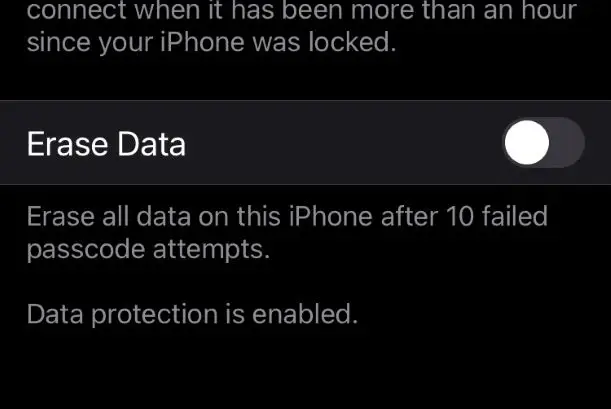
This feature has been around for as long as I can remember, but it’s often missed within the depths of the iPhone’s settings. While most people use a passcode and that protection is a great way to prevent people from getting into your iPhone’s private data. You can take other precautions if you are hyper-aware of your security or have very sensitive data on your phone.
This feature allows your phone to erase itself after ten failed passcode attempts. What I like about it is, outside of it protecting your data, the only correct way to unlock an iPhone after you’ve forgotten your passcode is to erase it, restore it from backup, and create a new passcode. With this feature turned on, even if it’s you who is entering the wrong passcode, you can save yourself the time-consuming task of restoring with iTunes.
How to turn on “Erase Data” after failed login attempts on iPhone
- Go to Settings
- Scroll down and find the *Erase Data toggle to turn this on and off
| 🛈 Even if you don’t think you have private information on your phone, you probably have more than you think. Anything from saved passwords in keychain to credit cards in the App Store is private information that you should keep secure. |
8 – Correct Siri’s pronunciation

We all know sometimes Siri gets pronunciation wrong. It’s bound to happen with the wide variety of names, languages, and spellings of those names. That sometimes leads to a very literal pronunciation of a word or name that is both silly and a bit annoying.
To fix it, simply use “Hey Siri,” or use your home button if you have one, and say “You’re saying my name wrong” or “You’re pronouncing my name wrong.”
Siri will then politely apologize and ask you to teach it how to say your name (i.e. “Okay, how do you say Christina?”) Once you have pronounced the name for Siri, you will be given a few pronunciations to chose from and can play them back to choose the best one.
Once you have made your decision click select to the right of the best pronunciation, and Siri will confirm that the change has been made.
9 – Scan documents on the go with your iPhone
Did you know you could scan documents with your iPhone? Maybe you don’t have a scanner or are out and about and need to scan a document for work or school. Either way, the Notes app is a great way to scan documents in a hurry. I’ve even used the scanning feature to scan my passport.
How to scan a document on your iPhone
To scan a document on your iPhone:
- Open the Notes app
- Create a new note
- Click the camera icon above the keyboard
- Click Scan Documents
The Notes app then opens your rear-facing camera and you can position the document within view.
The phone will scan the document by outlining it in yellow, and you can resize the edges of the scan to get a perfect fit. When you press down to do this, the phone will zoom in to that corner or edge so you are getting as close as possible. Once you are done, click save.
| 🛈 Note that to get the best results possible you want to make sure the document is flat, not wrinkled, and that you have good lighting. It is also recommended to have a flat background without other documents or patterns. I usually use my desk, and it works great. |
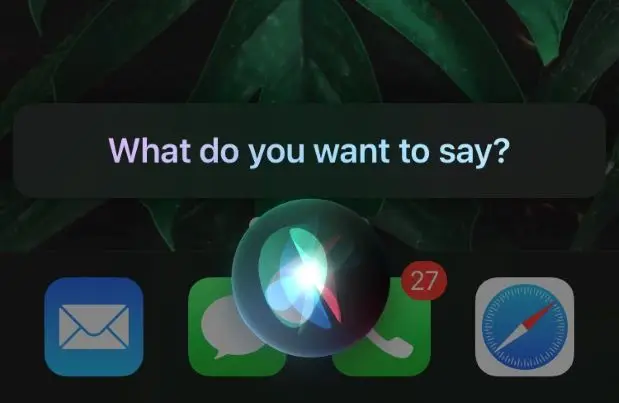
10 – Ask Siri to “Name That Tune”
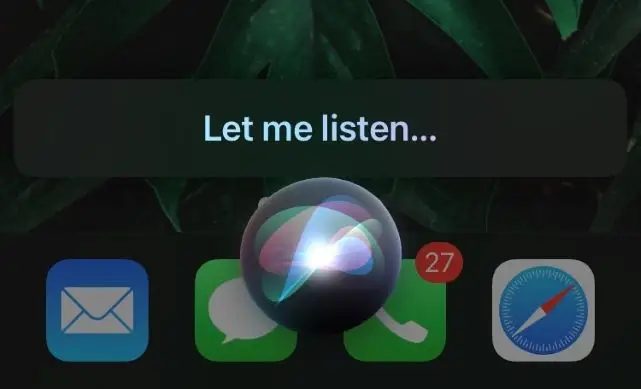
Ever fell in love with a song that was playing during a movie or on the radio and wanted to know who the artist was? While there are third-party apps that allow you to identify songs, like the ever-popular Sound Hound, you really don’t need a 3rd party application to find out the artist or song title.
Just ask Siri to “Name that Tune.” Siri will listen for a moment before giving you a link to the song in Apple Music.
11 – Unlock your iPhone with your voice
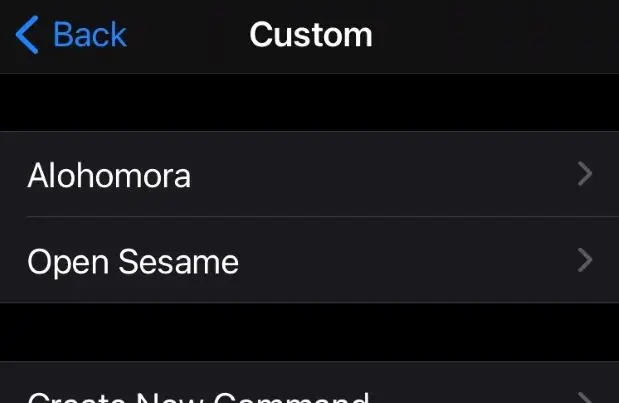
I don’t know how many Harry Potter lovers are reading this, but what if I told you that you could unlock your phone by saying “Alohomora?” Well, you can (I do). If you aren’t a Harry Potter fan, you can actually open your phone with any command you’d like (“Open Sesame” is another command I’ve seen used).
The steps to set this up are a bit more tricky than the others in this list, but still practical for everyday use once setup. You may need to try the last step a couple of times before you get it right.
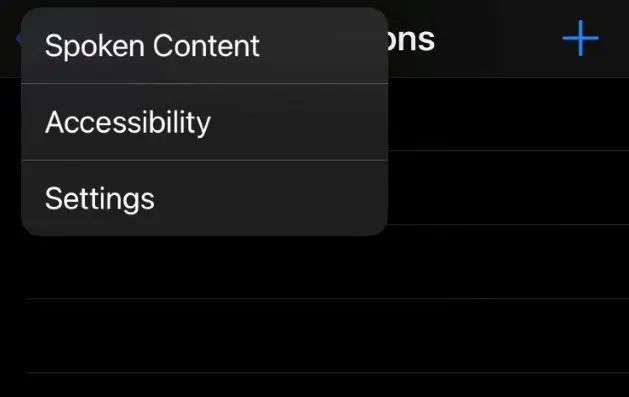
How to unlock your iPhone with a custom voice command
- Open Settings
- Click Accessibility
- Click Voice Control (not to be confused with voice over which is a completely different setting)
- Click Customize commands
- Click Custom
- Click Create new command
- Enter your chosen command (i.e. Alohomora)
- Click Run custom gesture
A screen will pop up where you will create the gesture.
The gesture is just where you press the screen when you type in your passcode. Say your passcode is “111111,” then you would click the spot on the screen where you think the 1 key is at six times to mimic that gesture. The thing that makes this slightly more difficult is that you bring up the keypad itself to see where the keys for your passcode are. If you don’t get it right the first time, just take a peek at your lock screen, make note of where the numbers are, and try again.
Once you get it right, give it a go. Take your phone to the lock screen, say your command, and watch it open up.
| 🛈 In step 3, you may need to click “Set up voice control” or turn on voice control first. |
12 – Use Emergency SOS to contact Emergency Services
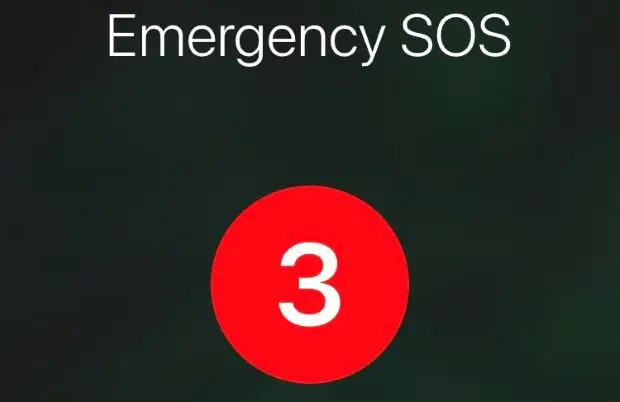
Emergency SOS is a quick, easy way to contact emergency services in the event of an emergency. While the feature is readily available to all users with iOS 11 and watchOS 4 or later, many iPhone users skim right past it during set up, missing the chance to learn about the feature, how it works, and end up never knowing it’s available to them.
So, here it is: quickly click your side/power button five times, and your phone will contact emergency services for you so that you can focus on the emergency in front of you. You can even set up an emergency contact in the Health app, and when Emergency SOS contacts emergency services. It will also send a message to that emergency contact.
Note that after pressing the side button five times, your phone will count down before dialing emergency services. This is there to make sure you intend to use Emergency SOS and ensure that you don’t accidentally click the power button too many times.
| 🛈 In order for Emergency SOS to work immediately, I would recommend turning on Auto Call in the Emergency SOS settings, so that you don’t have an extra step ahead of you before emergency services are contacted. |
13 – Switch to a one-handed keyboard
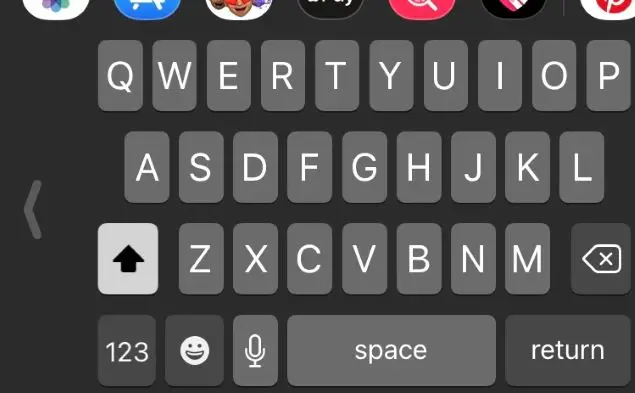
Over the years, iPhones have gotten bigger and bigger. While the big screens are great for watching videos or editing pictures, they can be a bit tedious for typing messages.
When holding my phone with one hand, my thumb doesn’t always quite reach the other side of the keyboard. To fix this, you can actually reduce the size of your keyboard and align it to the side with which you’re holding your iPhone.
How to switch to a one-handed keyboard on iPhone
- Press and hold the emoji button on your keyboard, then a few options will appear.
- You can choose the keyboard aligned to the left if you are left-handed, keep it centered with your normal keyboard, or chose the keyboard aligned to the right.
- Your keyboard will then align to the side of your choice, and you can continue typing with one hand.
How to put your iPhone keyboard back to normal
To put your keyboard back to normal:
- Press the arrow, which will be on the opposite side you have aligned it to (if the keyboard is aligned to the right, the arrow will be on the left. If it is aligned to the left, the arrow will be on the right), and it will go to its normal, centered alignment.
| 🛈 After pressing and holding the emoji key, you can also click keyboard settings to turn off predictive text or make any other specifications you prefer. |
14 – Use screen recording to share with friends
Screen Recording is a feature I use often when playing mobile games. When there’s a battle I can’t beat or a glitch happening in-game, I use screen recording and send it off to one of my guildmates.
While this is my favorite way to use Screen Recording, it can be used for many things. Maybe, you use it to show a tech issue you’re having so that you can send it to your tech-savvy friend, or to capture an entire message thread, post, or document as you scroll through versus having to take several screenshots.
How to screen record with an iPhone
To screen record: – Open your control center. – Click the screen recording button shown in the image above.
You will get a three-second timer before the recording begins. The recordings will then save to your photo library and can be shared like any photo or video.
How to turn on your microphone while screen recording
Did you know you can also turn on your mic when screen recording? Just press and hold the screen recording button in the control center and turn the mic on (it’s off by default).
If you need a more in-depth guide on how to use the screen recording feature, visit my step-by-step guide on how to screen record on an iPhone.
| 🛈 On iPhone’s with the home button the control center is brought up by swiping up from the bottom of the screen. On iPhones with Face ID, it is brought down by swiping down from the top of the screen. |
15 – Have Siri open apps or complete a task within an app
This is a simple one, but it has definitely sped up my screen time over the years. This is really beneficial for those who have many applications and homepages, or who use several folders and want to shorten their search for a specific app.
How to make Siri open apps
Imagine you’ve set up and hosted a Zoom meeting, and you want to check your Calendar to let your boss know about your upcoming events. Ask Siri, “Open Calendar,” and before you know it, you are viewing next week’s schedule.
You can even have Siri open 3rd Party apps like WhatsApp and have Siri send a message for you in the WhatsApp app, much like it can for messages.
How to make Siri complete a task within an app for you
Say you are out shopping, and you want to add a quick reminder to grab gas on the way home. Just use “Hey Siri,” or your home button if you have one, and say “Set a reminder to get gas on my way home.”
| 🛈 For this to work, certain apps may need to have specific settings. For example, the gas reminder that I mentioned above requires location services to be on in settings for the reminder’s app. |
16 – Have your iPhone remember your parking spot

This one feels a bit personal to me. I have been the lady with the cart full of sparkling water, snickerdoodles, and kitty-litter wandering through the parking lot trying to find my car in a sea of very similar-looking cars.
Luckily, with a quick request, Siri can save your parking spot for you. Just ask Siri, “Save my parking spot for me.” Siri will then take a moment to mark your location and let you know the job is done.
When you need to find your car, ask Siri “Where am I parked?” and Siri will show you a map and the location of your vehicle.
| 🛈 If your phone is not unlocked, Siri may ask you to unlock your phone to save your parking spot. You must also have location services on in settings. |
17 – Use your iPhone (Siri) to quickly translate
If you are traveling, are currently learning a language, or have friends or family whose first language is not English, Siri’s translation abilities can really help.
Just use “Hey Siri,” or press the home button. Then ask Siri, “Translate (insert phrase you are hoping to translate).”
Siri will then ask you which language you would like to translate from and give you a list. Click on your selected language, and Siri will give you the phrase both written and verbally so that you can copy and paste it, practice writing it, or practice saying it.
The languages Siri can translate
Currently, Siri cannot translate all languages, but here is a full list of which languages can be translated with Siri:
- Arabic
- German
- Spanish
- French
- Italian
- Japanese
- Korean
- Brazilian Portuguese
- Russian
- Mandarin Chinese
18 – Turn iPhone calculator into a scientific calculator
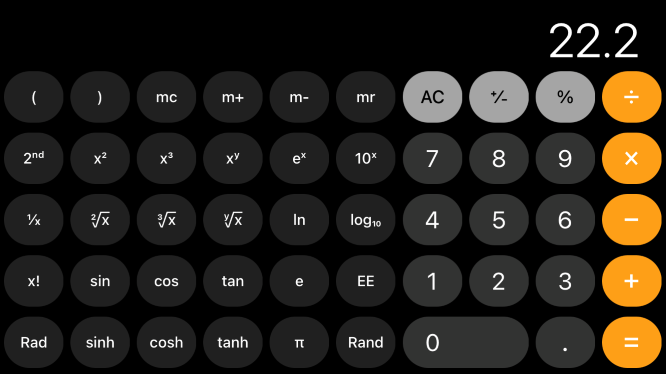
This is a handy trick for those in high school or college just in case you forget your scientific calculator. Simply turn your iPhone to landscape, and your calculator changes from a regular calculator to a scientific one with many more options so that you can complete those complicated equations!
| 🛈 In order for this to work, you need to make sure you do not have auto-lock turned on in your control center. |
19 – Hide photos and photo albums on iPhone
Most iPhone users know you can use hidden albums to put the photos you wish to hide selected photos, but it is still fairly easy to go to the Photo app > click on Albums > scroll down > and click Hidden to view those “hidden” photos. Luckily, with iOS 14, Apple has added an additional feature that hides the hidden album from the photo app altogether.
To remove this option from the bottom of albums:
- Go to Settings
- Click Photos
- Toggle off Hidden album
The hidden album will no longer appear until you turn it back on in settings.
20 – Navigate settings easier
With iOS 14, Apple simplified the Settings navigation by including a shortcut when you press and hold the back option in the upper left hand corner. For those of us who alter their settings often, like to try new settings out, use Accessibility features, or are doing a bit of troubleshooting on a software issue, this hidden shortcut allows you to go back to the previous settings, or go all the way back to the main settings page instead of having to click back several times to try to find your way to the previous page.
When pressing and holding the back option, which may also display itself as the previous settings page name (i.e. general, accessibility, battery, etc.) a list of the previous settings pages you used in navigating to your current spot is displayed, and you can chose the one you want to go back to.
21 – Straighten out your iPhone photos with a grid
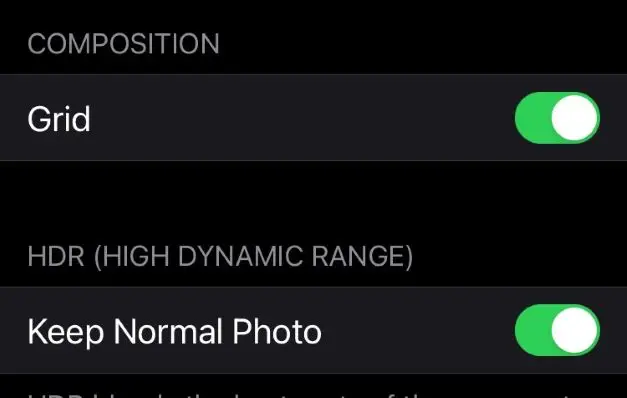
I bought my first iPhone for the camera. I saw a friend of mine had taken this beautiful photo of a storm out of her bedroom window and edited it within her iPhone. After that, I was sold. There are so many photo and camera settings to get professional-looking photos, and here is one of my favorites.
Have you ever been taking a photo and feel like you can’t quite get it centered, or the angle is just slightly off? Use a grid to get your image better aligned.
Go to Settings > Camera > Grid, and turn that feature on. Then, when you take photos, a grid will appear within the camera view so that you can straighten out photos.
| 🛈 The grid will not actually appear in the photos. |
22 – Add captions to iPhone photos
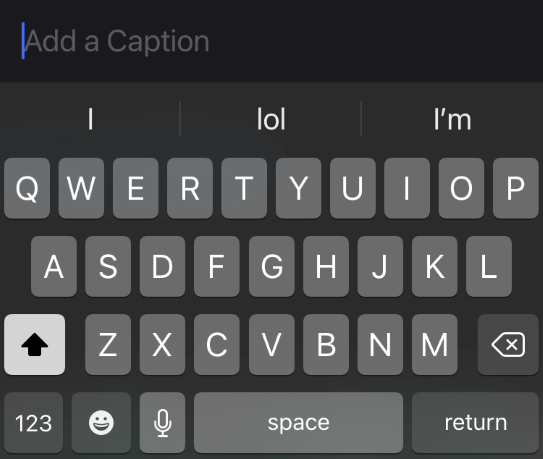
For those who like to stay extra organized, or have a lot of photos and want to remember why they have taken certain screenshots or more ambiguous photos, this is a feature that came out with iOS 14 and has been overlooked.
I like to use this for my in-game screenshots, because I tend to collect a lot of them, then forget why I took them. This also helps me to know if a screenshot is one I am okay with deleting when I am trying to increase my overall storage.
How to add captions or descriptions to iPhone photos
Add captions or descriptions to your photos after taking them by
- Going into the Photos application
- Swiping up on a photo
- Clicking the caption bar.
- Then, type in your caption, and it’s there until you decide otherwise.
23 – Lock iPhone notes securely with Touch ID or Face ID
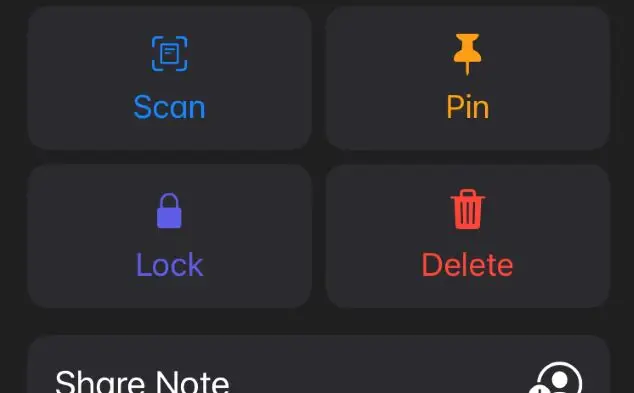
Many people use Notes to save passwords or other sensitive information. While using a password manager like 1Password is a more secure option for saving passwords, you may still have other data within Notes you don’t want others to have access to.
Maybe, you let your kids play games on your phone while you are driving, and you want to lock some of your notes before handing your iPhone over.
How to lock a current note on iPhone
For one of your current notes: – Open the notes app – Press and hold the note you want to lock – Click lock note
How to lock a new note on iPhone
For a note you are still working on, you have to type before you can lock, because notes without any text or content aren’t saved. With your note open:
- Press and hold the ellipses (…) in the upper right-hand corner
- Click Lock Note.
Want to pin a note on your iPhone?
You can also pin the note so that it goes to the top of your notes, and you don’t have to scroll through to find your most-used note, since they are by default organized by date.
| 🛈 Disclaimer: If you lock your note, and forget the password, you cannot get access to the note again. |
24 – Turn the keyboard into a trackpad on your iPhone
Typos happen. Sometimes, after you’ve typed a message it can be hard to get back to the exact spot that you need to or order to fix the typo. This change was made during iOS 13, and has made typo queen’s lived easier everywhere.
How to turn on trackpad feature in keyboard on iPhone
To use the trackpad feature:
- You hold down the space bar when your keyboard is up.
- Your keys will then disappear.
- You can then drag your finger to the spot corresponding with the typo in your message or document.
| 🛈 Make sure not to lift your finger after pressing and holding the space bar. Keep your finger on the screen, drag to the spot you need, and then lift to click the back button or add the missing letter or punctuation. |
25 – Use iPhone hot corners to lock your screen
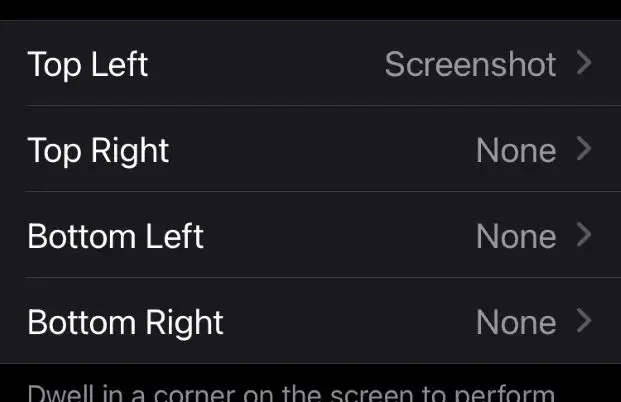
For the Mac users out there, most of you are familiar with hot corners. Hot corners allow you to lock your screen easily by moving your mouse to one of the bottom corners of the desktop. The Mac will immediately lock to your login screen. It’s a great security feature for those who work from home. Hot corners also second as a dashboard for Mac users who miss the old days.
iPhones also have the option to set up Hot Corners and have since iOS 13, which allows you to pick each corner of the iPhone and assign different actions.
How to set up Hot Corners on an iPhone
- Go to Settings
- Click Accessibility
- Click Touch
- Scroll down and click Hot Corners
- Click on each corner individually, and select an action for each one.
Let me give you a few examples of what actions you can assign to Hot Corners.
Examples
- Restart: By setting one of your corners to the Restart action, your phone will restart when you press that corner. If you do this accidentally, your iPhone will confirm that you want to restart, so don’t worry about restarting it accidentally if you have this feature on.
- App Switcher: By setting one of your corners to the App Switcher action, your app switcher will populate when you press that corner. Of course, if you don’t have any open apps or tabs, the app switcher will be blank.
- Lock Screen: By setting one of your corners to the Lock Screen action, your phone will go straight to the lock screen just like the Mac utilizes Hot Corners.
- SOS: By setting one of your corners to the SOS action, your phone will have another shortcut to using Emergency SOS, which I detail in this list.
These are just a few of the actions that can be assigned. To view the full list, give it a try!
26 – Use Assistive Touch to bring back the home button
While Assistive Touch was designed to be used as an Accessibility feature, I know many iPhone users use this because they miss the Home button. Face ID is a great feature, but not everyone has moved on from Touch ID, and some still enjoy the usability of having a home button.
By using Assistive Touch, you can bring back a home button, which will float on your screen and can be moved to whatever location you prefer, regardless of your iPhone’s model.
How to turn on Assistive Touch on iPhone
- Open Settings
- Click Accessibility
- Click Touch
- Click Assistive Touch
- Turn on Assistive Touch, and a round button much like the home button will appear.
You can then drag it to where you would like it and use it to bring up the following:
- Notification Center
- Custom: chose what option you would like here out of a list or add your own action
- Siri
- Device: this takes you to the following lock screen, rotate screen, unmute, volume up, volume down, or more
- Control Center
- Home
27 – Set your iPhone to flash for alerts and recognize background noises
Flash for alerts on iPhone
Here is another Accessibility function that I find really useful. I first noticed it when a friend of mine, who’s not deaf but is an active part of the deaf community, was over at my house for turkey burgers and her phone started flashing for a phone call instead of ringing.
What I like about enabling this feature is that it is a silent way to get alerts. If you work in an environment where you cannot have auditory notifications, have sleeping children and don’t want the noise to wake them, or have hearing and accessibility needs, this can be a great way to receive notifications.
How to turn on flash alerts on iPhone
Go to Settings > Accessibility > Audio/Visual > and turn on LED flash for alerts.
Sound recognition on iPhone
Sound recognition is an Accessibility feature meant to alert the hearing impaired of noises like fire alarms, door knocking, animal noises, babies crying, etc. While it is intended and works great for those purposes, it can also be helpful for those of us who often wear headsets (especially those that are noise reducing) for gaming, music, and movies.
If you have a sleeping baby, and don’t want to wake them but want to catch up on a bit of your favorite television show, you can put your headphones on, and let your phone keep an ear out for you.
How to turn on Sound Recognition on iPhone
Go to Settings > click Accessibility > click Sound Recognition > Turn Sound Recognition on > click Sounds, and chose which sounds you’d like your iPhone to listen for.
28 – Set DND for specific locations or activities on your iPhone
I don’t often use Do Not Disturb, otherwise known as DND. I don’t have it on by default, but when I am going into a movie, reception, meeting, or another event that requires me to be focused, I like to have DND turned on until I leave that location.
How to turn on location-based Do Not Disturb with iPhone
To turn DND on until you leave your current location:
- Bring up the Control Panel,
- Press and hold the DND icon
- Click Until I leave this location.
When you leave that location, DND will turn off for you using your location services.
Tip
You can also have Siri turn on DND by using “Hey Siri,” and saying, “Turn Do Not Disturb On.”
| 🛈 Location services must be turned on for this feature to work. |
29 – Quickly share your location with friends
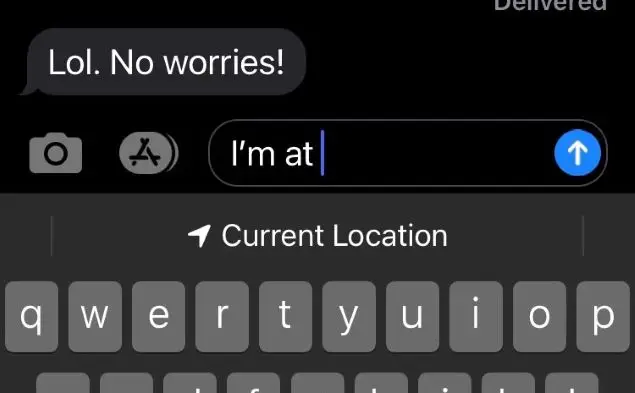
When meeting up with friends, this can be a low-maintenance way to share your location and make meeting up easier. There are many ways to share your location with other iPhone users, that can simplify your commute.
How to share location in Message app with iPhone
To share your location in the Messages App:
- Open the message thread
- Type “I’m at”
- Hit the space key
- Click current location, and it will send your locations.
The recipient will be redirected to their maps and navigate directly to you.
Another way to share location on iPhone
You can also share your location by:
- Opening the Messages app
- Clicking the message thread you want
- Click the contact profile at the top of the page
- Click the information (i) below that contacts name
- Click “share my location”
- Choose the timeframe you would like to share.
*You can choose to share indefinitely, until the end of the day, or for the next hour.
Tip
Using the Share my Location feature is also a great way to get picked up if you are stranded and need a tow from a friend or family member, or for kids who might not know directions where their friend’s house or local hangout is.
| 🛈 It’s important to note that the “I’m at” method only works with other iPhone users. This is an iMessage feature that cannot be shared with Android users. |
30 – Adjust iPhone settings quickly in Control Center
Obviously Control Center is there to give iPhone users easy access to their most-used settings and features. A quick swipe and everything you use most are right at your fingertips. Most don’t know that you can hold down each setting or feature in the control center, and more options will populate.
Here are a few examples:
Adjust brightness in iPhone Control Center
Swipe up, or down depending on your phone, to bring your control center up. Then press and hold the Brightness scale. You can then select Dark Mode to turn it off or on, or you can select Night Shift to turn it off or on.
I like to turn on Night Shift when I am in bed reading from the Books app. It is a faster method for turning Night Shift on, so I can get back to my book.
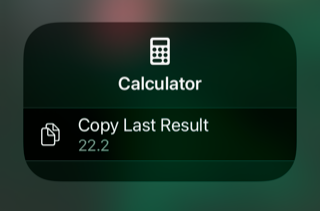
Use iPhone calculator in Control Center
I like to use the Calculator app to do my budget every month, which I finish in the Numbers app.
Did you know that if you open Control Center > press and hold the calculator icon > a “Copy Last Result” option will pop up? You just click the copy last result option, and you can copy it to whatever document, message, or app you’d like.
Use iPhone flashlight from Control Center
Flashlight is one of the most popular iPhone features. It’s a great, accessible tool to use whenever you lose something or are trying to make it from one room to another in the middle of a blackout. Sometimes, the light can be a bit too bright depending on how light or dark it is where you are using it. To change this, you can adjust the brightness level in Control Panel.
If you open Control Panel > press and hold the flashlight icon > and chose your brightness level within the flashlight scale.
| 🛈 You only need to press and hold the icons for a couple seconds for the additional options to appear. |