How to Build a Bitcoin/Cryptocurrency Price Ticker Using a Raspberry Pi

Share
What you'll need
Interests
Posted in these interests:


If you’re like me and check cryptocurrency prices throughout the day, every day, then you’d probably benefit from a dedicated cryptocurrency price ticker. This will save you from having to pull out your phone to check prices on Ifttt, which always leads to undesired distractions. Plus it’s just awesome.
This project uses a Raspberry Pi Zero WH (wireless, with pre-soldered headers), an LED Matrix Panel, and RGB Matrix Bonnet, and a few miscellaneous cables that I’ll link to in the Tools and Materials section of this guide. Altogether this project costs just over $100, but you can definitely take some steps to cut costs. Time-wise it took me about 10 hours, but since I’ve done the leg work and written the software, it should only take you about an hour to assemble and configure (minus the time to print the case, if you choose to do so).
In this guide, you’ll learn how to set up the LED panel, install the crypto-ticker library, and configure it to show the cryptocurrencies you’re tracking. Let’s get started!
1 – Install Raspberry Pi OS
The first step of every great project is to install Raspberry Pi OS. Fortunately, we’ve written a guide that shows you how to install Raspberry Pi OS on your Raspberry Pi. Follow the steps to flash Raspberry Pi OS on your micro SD card, then jump back to this guide to continue.

How to Install Raspberry Pi OS on Your Raspberry Pi
Get the new official Raspberry Pi OS on your Pi.
2 – Configure the LED Panel
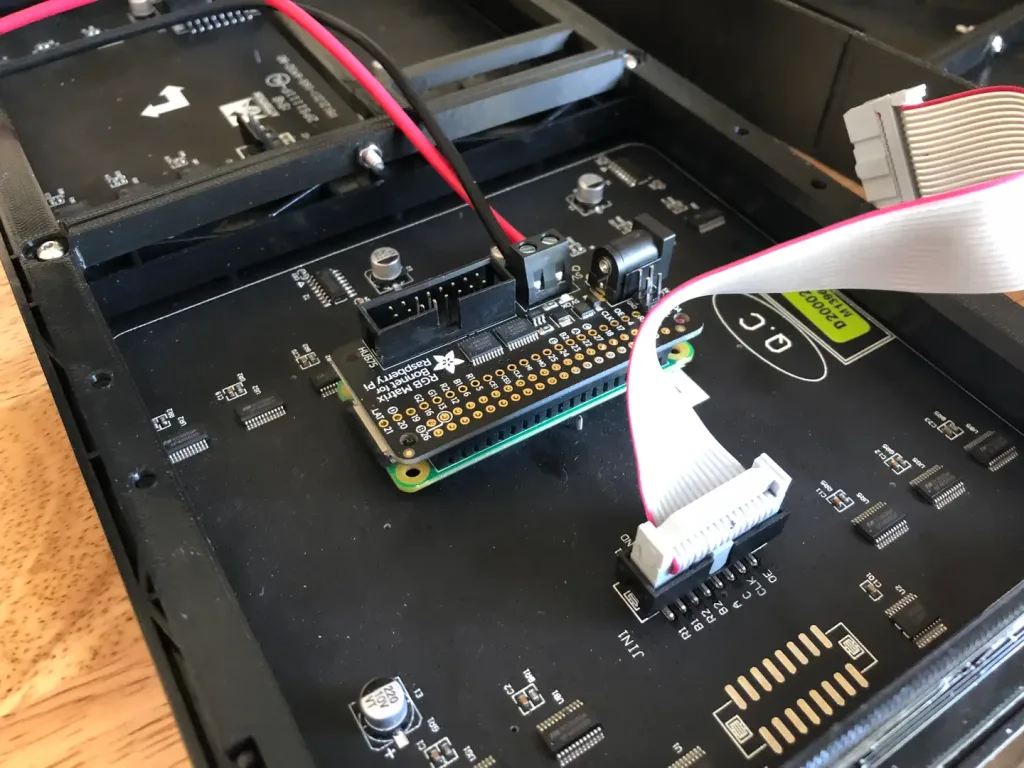
Hardware setup
In an effort to save space, I’m again going to refer you to the guide we’ve written that shows you how to use the LED Matrix Panel with your Raspberry Pi.

How to Use an LED Matrix Panel with Your Raspberry Pi
An LED matrix will make any project better.
Refer to this guide if you need help setting up the LED panel hardware. Since we’re going to use Docker to run the application, you won’t need to install the dependencies yourself. So please use the above guide to get your hardware set up only.
What you need
For this step, you’ll need the LED Panel, the RGB Matrix Bonnet, and the Pi Zero WH.
This is one area where you can save a little bit of money. We referred you to a reliable panel made by Adafruit. There are cheaper alternatives on Amazon if you’re willing to experiment.
Optional case
Keep in mind that the 3D-printed case is optional. If you’ve got a 3D printer and want to give it a shot, great! It will certainly make the project look more professional.
3 – (Optional) Add a power button
Since the Raspberry Pi doesn’t ship with a physical power button, you may want to add your own. This isn’t required, but it is a good (and safe) way to shut down your Pi when you’re not using it (like if your spouse gets tired of the Bitcoin price glowing at night).
We’ve written a solid guide that shows you how to add a power button to your Raspberry Pi. I’m linking to the guide here because we need to do some work before wrapping up the hardware portion of this guide.

How to Add a Power Button to Your Raspberry Pi
Because you should always safely shut down your Pi.
If you’re not going to add the power button, skip ahead to the next step.
Solder male header pins
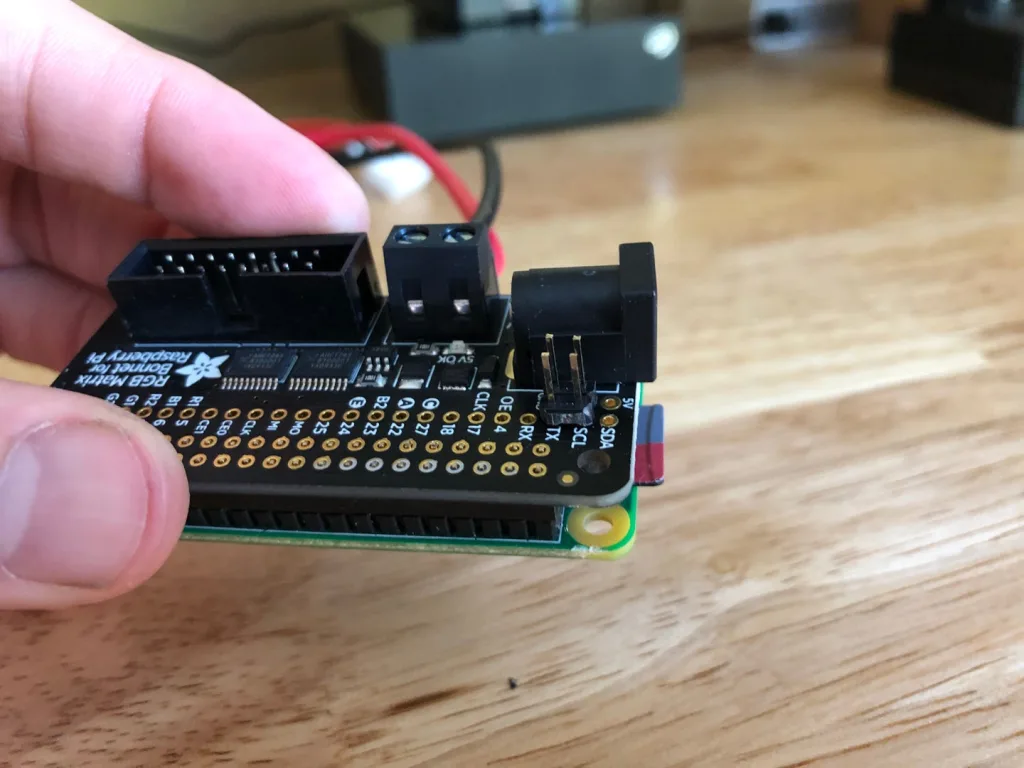
The RGB Matrix Bonnet attaches to the entire GPIO header on the Pi, but it does expose some GPIO holes that you can solder pins or wires to. In this case, you only need to solder pins to the SCL and GND holes, but for simplicity, I soldered a 2×2 pin square that covers both of the pins I need (see the image below).
Drill a hole in the case
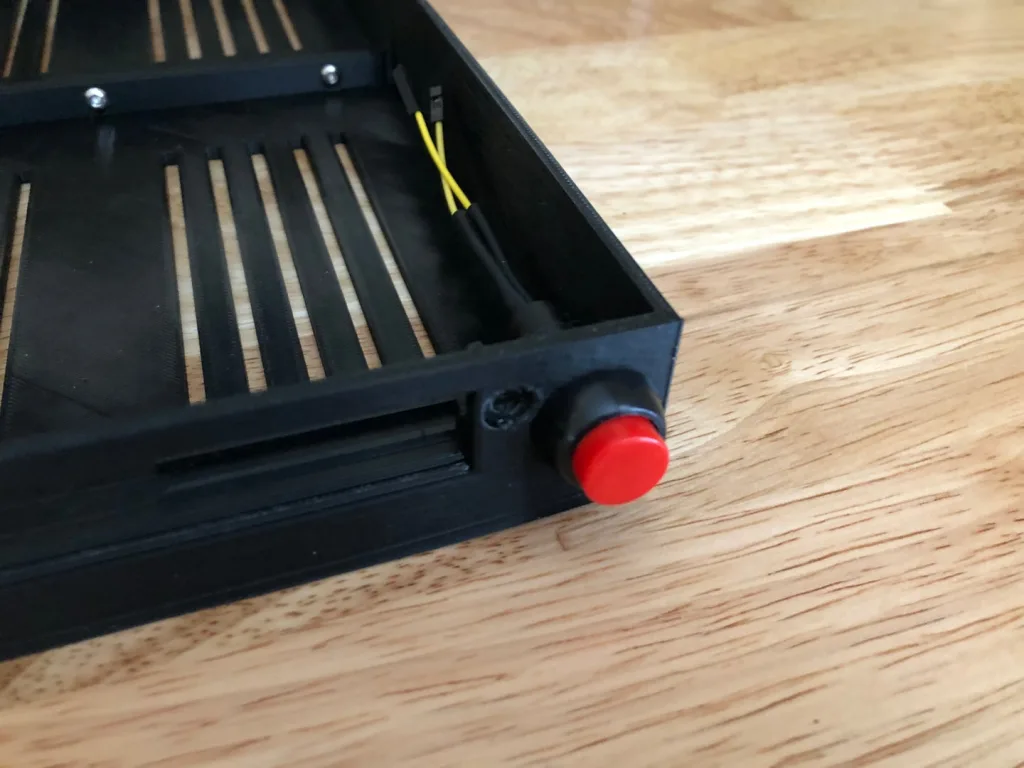
If you’re not using a case, you can skip this piece and just let the button dangle! But if you’re using the case we recommended, you’ll need to drill a 1/2″ hole to attach the power button. Again see the image for details.
The location of the button doesn’t matter as long as you’ve got male-to-female jumper cables to extend the leads to the Pi. I put my power button on the Pi-side at the very top.
It’s worth noting at this point that the power button we sell does not fit in the hole that the case provides. If you’d like to buy a smaller button, you can skip drilling the hole. But I do recommend using the power button we sell because it comes from a reputable source and you get to support your favorite DIY site 🙂
Connect to the leads to the bonnet
When you’re ready to close up the case, attach the leads (or the jumper wires) from the button to the SCL and GND pins on the bonnet.
4 – Secure the case
If you’re using the case, now is the time to secure it. To do so, you’ll need to place the panel face down. Then drop two M3 nuts into the brackets on each side of the panel.
Now place the case on top of the panel, and use the M3 screws to secure it.
5 – SSH into your Pi
Now it’s time to log in to your Pi and install the software. To begin, you’ll need to open your Terminal application and SSH into your Raspberry Pi.

How to Connect to a Raspberry Pi Remotely via SSH
The preferred (and most common) method of connecting to your Pi to run commands.
ssh pi@raspberrypiIf you’ve got multiple Pi’s on your network, or the hostname doesn’t work for some reason, you’ll need to find your Raspberry Pi’s IP address and use it instead.
6 – Install Docker
Next you need to install Docker and docker-compose on your Pi. To install Docker, run the following:
# Install docker
curl -sSL https://get.docker.com | sh

# Add the pi user to the docker group (so you don't have to use root to use docker)
sudo usermod -aG docker pi

# Install docker-compose
sudo pip3 -v install docker-compose
Why Docker?
Docker allows us to run our application as a software container. For the purpose of this project, it allows us to define all of our dependencies in a Dockerfile and build the application as an image. This saves you from having to run a bunch of commands to install packages directly (among other advantages).
7 – Clone the crypto-ticker repository
Git should already be installed on your Raspberry Pi, but if it’s not you can install it using apt-get install git.
Clone the crypto-ticker repository with the following command:
git clone https://github.com/Howchoo/crypto-ticker.git8 – (Optional) Create your own settings.env file
To run the application, you’ll need to add your custom settings.env file. This file will be mounted onto the running container and provide the application with any settings you wish to provide.
You’ll need to cd into the crypto-ticker directory:
cd crypto-tickerThen use your favorite text editor to create the settings.env and add any of the following settings:
| Name | Default | Description |
|---|---|---|
| SYMBOLS | btc,eth | The asset symbols you want to track. |
| API | coingecko | The API you want to use to fetch price data. Currently supported APIs are “coingecko” and “coinmarketcap”. |
| REFRESH_RATE | 300 | How often to refresh price data, in seconds. |
| SLEEP | 3 | How long each asset price displays before rotating, in seconds. |
| CMC_API_KEY | The CoinMarketCap API key, required if you specified API=coinmarketcap. | |
| SANDBOX | Used for CoinMarketCap only. Set SANDBOX=false if you’re developing and want to use the sandbox API. |
Example:
SYMBOLS=btc,eth,ltc,xrp
API=coingecko
9 – Run docker-compose up
With your settings.env file in place, you’re ready to start the application. Run the following:
docker-compose up -dThis command will take a few minutes because it needs to read from docker-compose.yml, build the image, install the dependencies, and start the application.
It’s worth noting that the ticker service in the docker-compose file specifies that we want to restart the container “always”. This means that if the container dies, it will be restarted automatically. It also means that when the machine restarts, the container will start up as well. This is an easy way to run the crypto-ticker application on boot.
10 – Enjoy your work!
The application takes a few seconds to get started, but once it does you should see your crypto prices flash before your very eyes. The panel will scroll through the crypto symbols you specified in your settings.env file, and it will update prices every five minutes.
Attention developers
If you’re a software developer and want to contribute to this project, I’d be happy to have you participate. Feel free to fork the repository and submit a pull request.
Here are some ideas for improvements:
- Add cryptocurrency icons to the display
- Add a “Loading” screen when the Pi is booting
- Add some animation to transition between screens, maybe even allow the user to specify the transition
Share and comment
If you like this project, please share it on Facebook and Twitter. If you have any questions or feedback, feel free to leave a comment below.
11 – Troubleshooting
This project is new and there’s still work to be done. With that said, you might run into errors that aren’t properly handled. If this happens, I recommend the following.
Many of these steps should be performed from the crypto-ticker directory on the Pi. So perform the following in advance, when required:
ssh pi@<ip>
cd crypto-ticker
Check the logs
Use the docker-compose command to check the logs for the ticker service:
docker-compose logs tickerIf there was an error in the program, the exception should be printed out here.
Restart the ticker
As a quick fix, you might have luck just restarting the ticker. To do so, you can use the docker-compose restart command:
docker-compose restart tickerPull the latest code
Over time, I do try to fix bugs and make the error handling more robust. To pull the latest code, you can use the following:
git pull origin masterThen you’ll want to rebuild and take the application back up, like this:
docker-compose down
docker-compose up --build
Create an issue
If you run into issues that can’t be resolved, feel free to submit an issue here.
You can also hit me up on Twitter if you have questions.


