Automatically Control Your Raspberry Pi Fan (and Temperature) with Python

Share
You'll Need 11
What you'll need
Interests


Since the Raspberry Pi 4 was released, many have noticed that it can get pretty hot, especially when the CPU is under heavy load.

Raspberry Pi 4: Review, Specs, and Where to Buy
The latest and greatest in single-board computing!
A Raspberry Pi enthusiast, Jeff Geerling, released a pretty cool video showing how to add a fan to the Raspberry Pi to help keep the temperature under control. That project was pretty great but I wanted to take it to the next level and add the ability to only turn the fan on when needed by monitoring the core temperature. This way, a noisy fan isn’t running all the time.

How to Add a Fan to the Raspberry Pi 4 for Proper Cooling (You Need One)
It’s getting hot in here, a fan will cool your Pi.
In this guide, I’ll cover the whole project from start to finish. First, we’ll install the fan onto the official Raspberry Pi case and wire it up so it can be activated by a GPIO pin. Then we’ll write some Python code to monitor the temperature and activate the Pi when the temperature reaches a certain threshold.
Requirements
In order to complete this guide, you’ll need a Raspberry Pi 4 with the latest version of Raspbian installed. The scripts I’ve included are written for Python 3.7, which is the default Python 3 version in the September 2019 version of Raspbian. Newer Raspbian versions will work as well 🙂
Update 11/30/20: An official Raspberry Pi 4 case fan was recently released. This is ideal for anyone who wants to cool their Pi with name-brand hardware. It’s specifically designed to fit the official Raspberry Pi 4 case.
1 – Install the fan onto the case
The fan installation is pretty simple, and we’ve covered it in more detail elsewhere. In this guide, I’ll cover the basics, but if you need more detailed instructions head on over to our guide on installing the fan onto your Raspberry Pi 4.
How to Add a Fan to the Raspberry Pi 4 for Proper Cooling (You Need One)
It’s getting hot in here, a fan will cool your Pi.
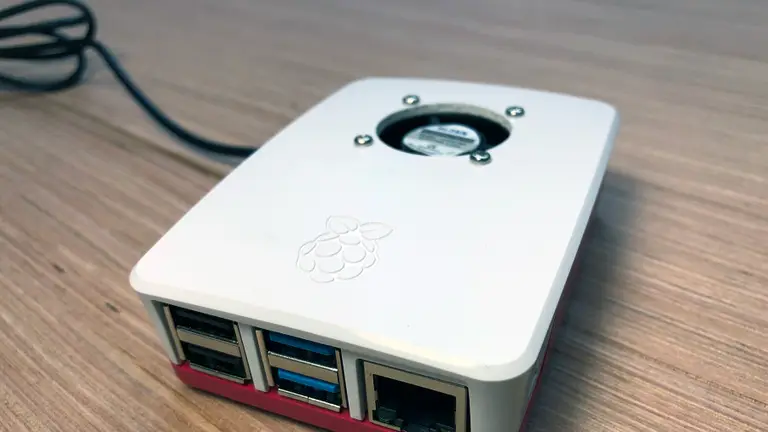
Drill a hole for the fan
There is plenty of room for the fan as long as you keep it away from the USB ports. See the image for reference. Place a mark on the Pi case where you want the center of the fan to be. Then drill a hole using a 1-1/8″ hole saw. I was fortunate enough to have access to a drill press, but if you don’t, a handheld drill will work. After the hole is drilled, smooth out the rough edges with sandpaper or a file.
Drill screw holes
With the fan hole drilled, place the fan on the inside of the case, centered in the hole. Then mark the case at the center of each screw hole. For this you can use a center punch, small screwdriver, or pencil. Then, remove the fan and carefully drill the screw holes using a 7/64″ drill bit.
Mount the fan
I’m going to add this step here but I actually recommend doing this after the fan is wired up. When you’re ready, mount the fan inside the case with the Pi-FAN sticker facing up. Use the included nuts and bolts to secure the fan inside the case.
2 – A explanation of the circuit
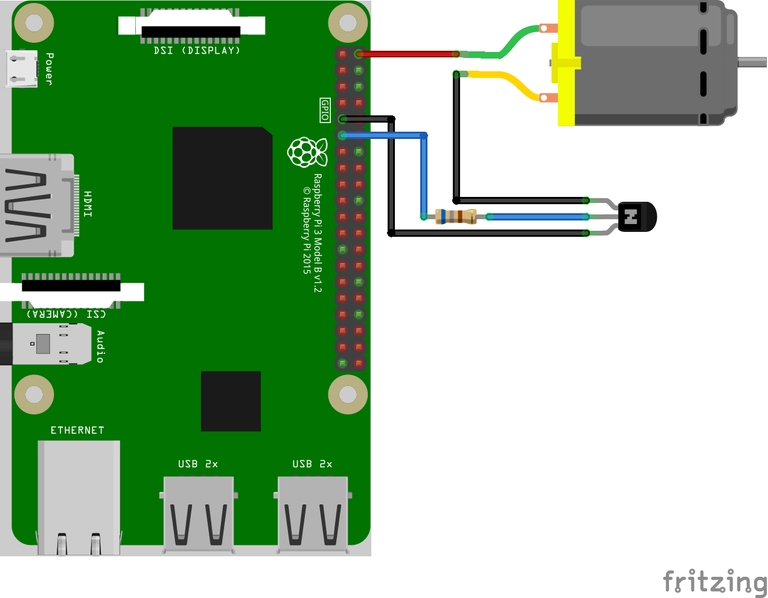
In this step, I’ll provide a breakdown of the circuit. We’re only using a few components: the 5V fan (represented by the big DC motor in the image), a 680Ω resistor, and an NPN transistor (2N2222).
Fan power needs
The transistor is the most interesting piece of this circuit. It’s necessary because the fan requires 5V to operate but the Pi’s GPIO pins are only capable of supplying 3.3V. GPIO pins could power something small, like an LED, but they shouldn’t be used for anything more. Likewise, the Pi’s 5V pins are connected directly to the power supply and cannot be controlled via software. Therefore, we need a way to power the fan using the 5V pin, but switch it on and off using a GPIO pin. Enter the transistor.
Transistor
The transistor is an interesting electrical component used to switch or amplify power. In our case, we’re using it as a switch. There are many types of resistors, but we’re using an NPN transistor. So the “base” pin of the transistor is connected to the BCM 17 (a GPIO pin) with a 680Ω resistor in between. The positive lead on the fan is connected to the 5v pin, and the ground is connect to the “collector” pin in our transistor. Lastly, the “emitter” of the transistor is connected to the ground.
So when pin 17 is switched to HIGH, it will send some voltage to the base of the transistor, which closes the circuit and turns on the fan.
3 – Build the test circuit
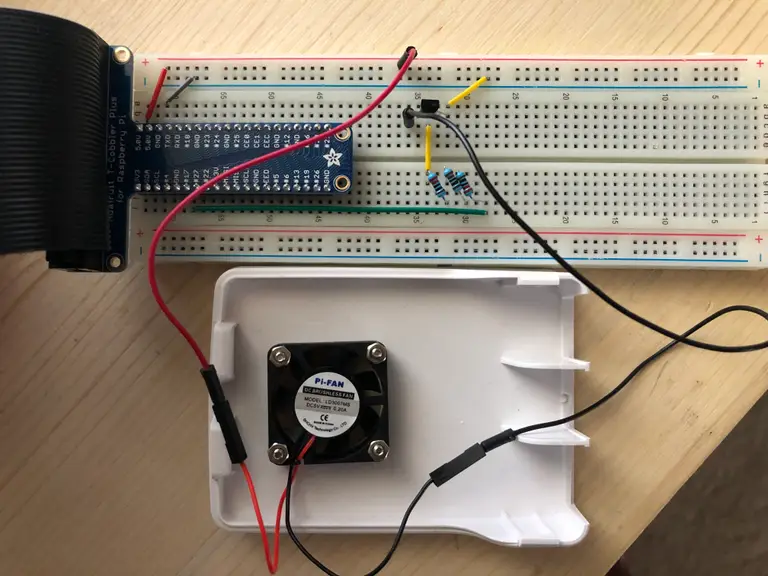
Before soldering anything, it’s wise to test the circuit using a breadboard. I will avoid another explanation of the circuit but I hope that, between the previous step and this image, you’ll be able to reconstruct the circuit. We won’t be able to test the circuit until the software is written, so let’s move on to the next step!
4 – Use the install script
I created the fan script and published it to a public Howchoo repo called pi-fan-controller.
The easiest way to install the fan controller scripts is to use our install script. To do so, SSH into your Pi and clone the repository:

How to Connect to a Raspberry Pi Remotely via SSH
The preferred (and most common) method of connecting to your Pi to run commands.
git clone https://github.com/Howchoo/pi-fan-controller.gitIf you don’t already have git installed, you’ll need to install git first using sudo apt-get install git.
Next, install the requirements:
# If pip is not already installed run:
sudo apt install python3-pip

# Install requirements globally
sudo pip3 install -r pi-fan-controller/requirements.txt
Now, run the install script:
./pi-fan-controller/script/installThis script installs fancontrol.py which monitors the core temperature and controls the fan. Also, it adds a script called fancontrol.sh to /etc/init.d and configures the script to run when the system boots.
| 🛈 The next two steps describe the manual installation of these scripts and covers how they work in more detail. Feel free to skip the next two steps if you just want to get on with it. |
5 – Write the fan controller code (optional)
Skip this step if you used the install script above.
We’re going to need code that continuously monitors the core temperature and turns on the fan when the temperature reaches a certain threshold.
So we’ll connect to the Pi via SSH and create a file called fancontrol.py. To create this file, run:
nano fancontrol.pyAdd the following to the file, save, and exit:
#!/usr/bin/env python3

import subprocess
import time

from gpiozero import OutputDevice


ON_THRESHOLD = 65  # (degrees Celsius) Fan kicks on at this temperature.
OFF_THRESHOLD = 55  # (degress Celsius) Fan shuts off at this temperature.
SLEEP_INTERVAL = 5  # (seconds) How often we check the core temperature.
GPIO_PIN = 17  # Which GPIO pin you're using to control the fan.


def get_temp():
    """Get the core temperature.
    Run a shell script to get the core temp and parse the output.
    Raises:
        RuntimeError: if response cannot be parsed.
    Returns:
        float: The core temperature in degrees Celsius.
    """
    output = subprocess.run(['vcgencmd', 'measure_temp'], capture_output=True)
    temp_str = output.stdout.decode()
    try:
        return float(temp_str.split('=')[1].split('\'')[0])
    except (IndexError, ValueError):
        raise RuntimeError('Could not parse temperature output.')


if __name__ == '__main__':
    # Validate the on and off thresholds
    if OFF_THRESHOLD >= ON_THRESHOLD:
        raise RuntimeError('OFF_THRESHOLD must be less than ON_THRESHOLD')

    fan = OutputDevice(GPIO_PIN)
while True:
        temp = get_temp()

        # Start the fan if the temperature has reached the limit and the fan
        # isn't already running.
        # NOTE: `fan.value` returns 1 for "on" and 0 for "off"
        if temp > ON_THRESHOLD and not fan.value:
            fan.on()

        # Stop the fan if the fan is running and the temperature has dropped
        # to 10 degrees below the limit.
        elif fan.value and temp < OFF_THRESHOLD:
            fan.off()

        time.sleep(SLEEP_INTERVAL)
Now we’ll move the script to /usr/local/bin, which is the ideal location for scripts that normal users can run. Then we’ll make it executable.
sudo mv fancontrol.py /usr/local/bin/
sudo chmod +x /usr/local/bin/fancontrol.py
6 – Execute the fan controller code on boot (optional)
Skip this step if you used the install script above.
We’ll want to run this script when the Pi boots, otherwise it won’t do us much good. To do so, we’ll create a shell script that will execute on boot and launch our script.
Create a file called fancontrol.sh and add the following:
#! /bin/sh

### BEGIN INIT INFO
# Provides:          fancontrol.py
# Required-Start:    $remote_fs $syslog
# Required-Stop:     $remote_fs $syslog
# Default-Start:     2 3 4 5
# Default-Stop:      0 1 6
### END INIT INFO

# Carry out specific functions when asked to by the system
case "$1" in
  start)
    echo "Starting fancontrol.py"
    /usr/local/bin/fancontrol.py &
    ;;
  stop)
    echo "Stopping fancontrol.py"
    pkill -f /usr/local/bin/fancontrol.py
    ;;
  *)
    echo "Usage: /etc/init.d/fancontrol.sh {start|stop}"
    exit 1
    ;;
esac

exit 0
Move this file to /etc/init.d, and make it executable:
sudo mv fancontrol.sh /etc/init.d/
sudo chmod +x /etc/init.d/fancontrol.sh
Now we’ll register the script to run on boot:
sudo update-rc.d fancontrol.sh defaultsNow, you can either restart your machine, or kick this off manually since it won’t already be running:
sudo rebootor
sudo /etc/init.d/fancontrol.sh start7 – Wire up the fan
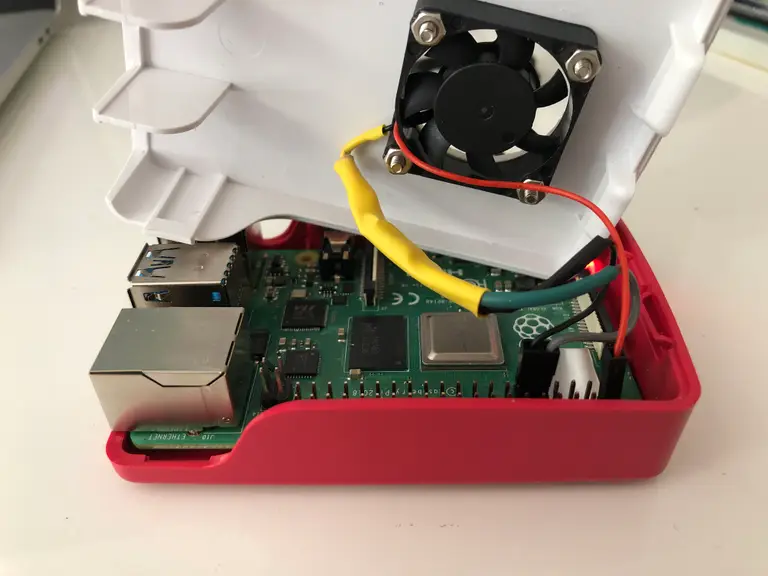
With everything working, let’s wire up the fan!
Use the schematic and breadboard photo to build the circuit. In this step, I’ll provide a photo of the fan fully wired and connected to the Pi. If you need more detailed help with step, please let me know in the comments section below.
Here are the basic steps (always refer to the diagram for help):
- Strip the ground (black) lead on the fan.
- Grab a female jumper wire (or multiple if you want different colors), cut it in half and strip the ends.
- Solder the resistor(s) to one female jumper wire, then to the “base” pin on the transistor.
- Solder the other jumper wire to the “emitter” pin on the transistor.
- Solder the ground lead from the fan to the “collector” pin on the transistor.
| 🛈 Make sure to use heat shrink to cover the connections and place it on before soldering! |
8 – Testing our work
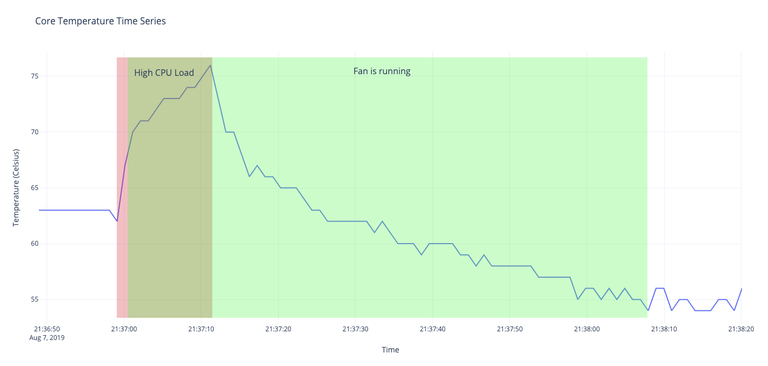
I wanted to visualize my work, so I rigged up a demo. This required two scripts:
outputtemp.pyoutputs the time and core temperature every second.cpuload.pyruns a busy process on each core.
So during my test window, I measured the core Pi temperature every second, and at some point during the window increased the cpu load, hoping to increase the core temperature. At 65° C, I expected the fan to kick on and start cooling off the Pi. Then when I stopped the load test, I expected the temperature to drop quickly. And once it reached 55° C, I expected the fan to turn back off.

Measure the Core Temperature of Your Raspberry Pi
Hot pie is delicious, but a hot Pi is not.
And sure enough, as you can see from the graph, it worked as expected!
9 – Make your own modifications
In the script above, you may have noticed two variables at the top:
ON_THRESHOLD = 65
OFF_THRESHOLD = 55
SLEEP_INTERVAL = 5
GPIO_PIN = 17
These variables can be configured to your liking. ON_THRESHOLD and OFF_THRESHOLD are the temperatures at which the fan will turn on and off (respectively), and SLEEP_INTERVAL is how often the program checks the core temperature. If you need to change the GPIO pin, you can do that here as well.
Feel free to customize either of these variables, but keep in mind that the max temperature is 85°C, and the CPU will be throttled at around 80°C, so we’ll want to keep the temperature well below that.
10 – Conclusion
I hope you enjoyed this guide. If you have any comments, questions, or even recommendations for improvement, please let me know in the comments below. And be sure to check out the GitHub repo for this project!


