Build Your Own Live NHL Scoreboard with Raspberry Pi and LEDs!

Share
What you'll need
Interests


Posted in these interests:

In this Howchoo guide, I’ll show you how to build your own NHL scoreboard that automatically displays live game data for your favorite hockey team!
The purpose of this guide is not only to combine hockey and technology, but to teach you how to work with and control LED panels using a Raspberry Pi computer. Armed with this knowledge, you can create all kinds of displays. 🙂
This is a beginner-friendly, mostly plug-and-play project that should take about an hour to complete.
How it works
To make everything work, we’ll connect a small Raspberry Pi computer to a 64×32 LED panel using a small breakout board. (We use the same panel in our Raspberry Pi LED matrix panel guide.)
Then, we’ll use the nhl-led-scoreboard library to automatically retrieve your favorite team’s current and upcoming game data. When a game is in play, it will show the current period, score, game clock, and even an animation when a team scores. Not a hockey fan? There are MLB and Fantasy Football libraries too.

Someone Made a DIY Fantasy Football Raspberry Pi-Powered Scoreboard
May your wins and losses shine with the glow of an RGB LED.
Everything is housed in a 3D-printed enclosure. The enclosure is optional; you can also mount the components directly to the back of the panel or set them behind it. If you don’t have a 3D printer and still want the enclosure, there are other ways to get it printed.

How to Get Things 3D Printed Without a Printer
No printer? No problem.
Watch the video
Check out my full build video and then read the rest of the guide below!
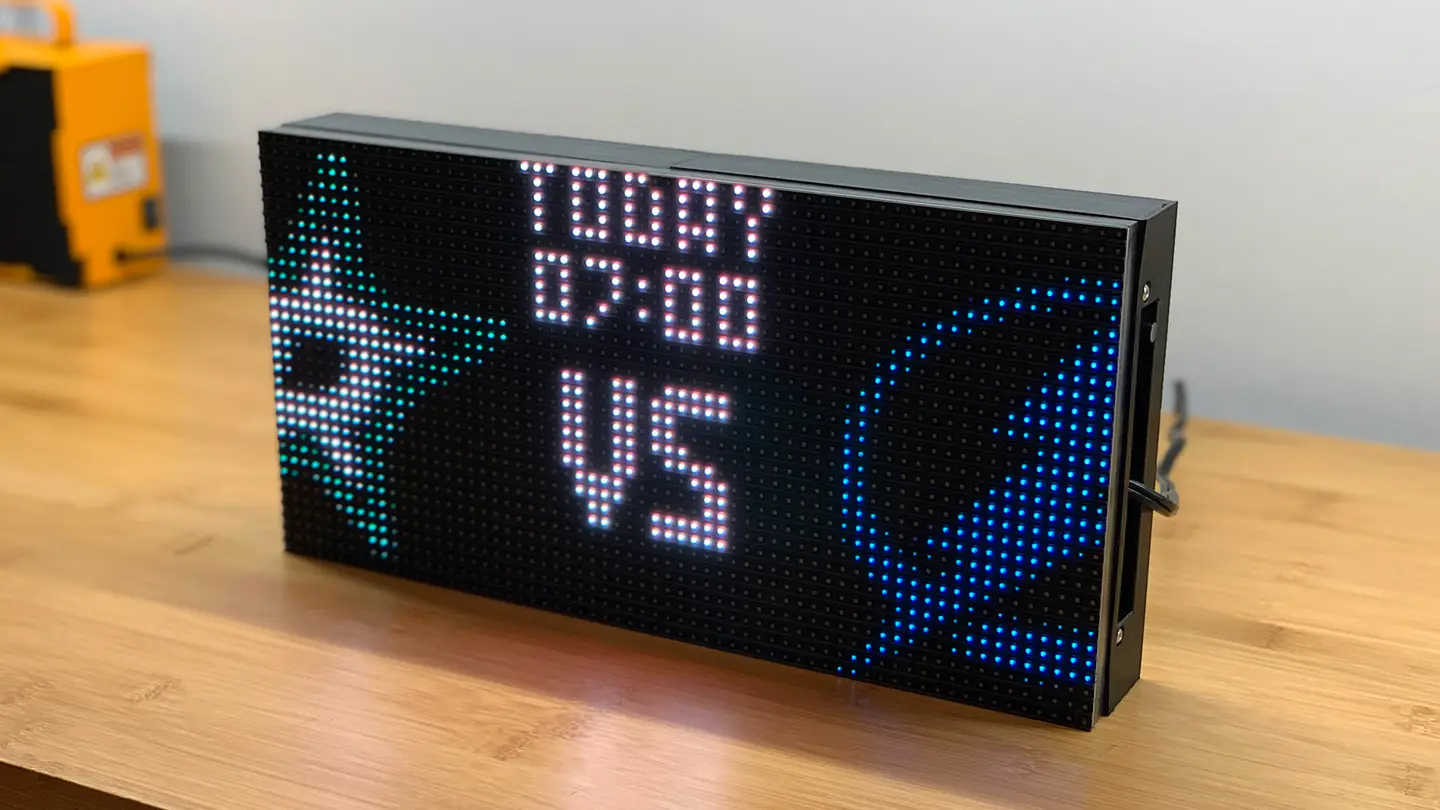
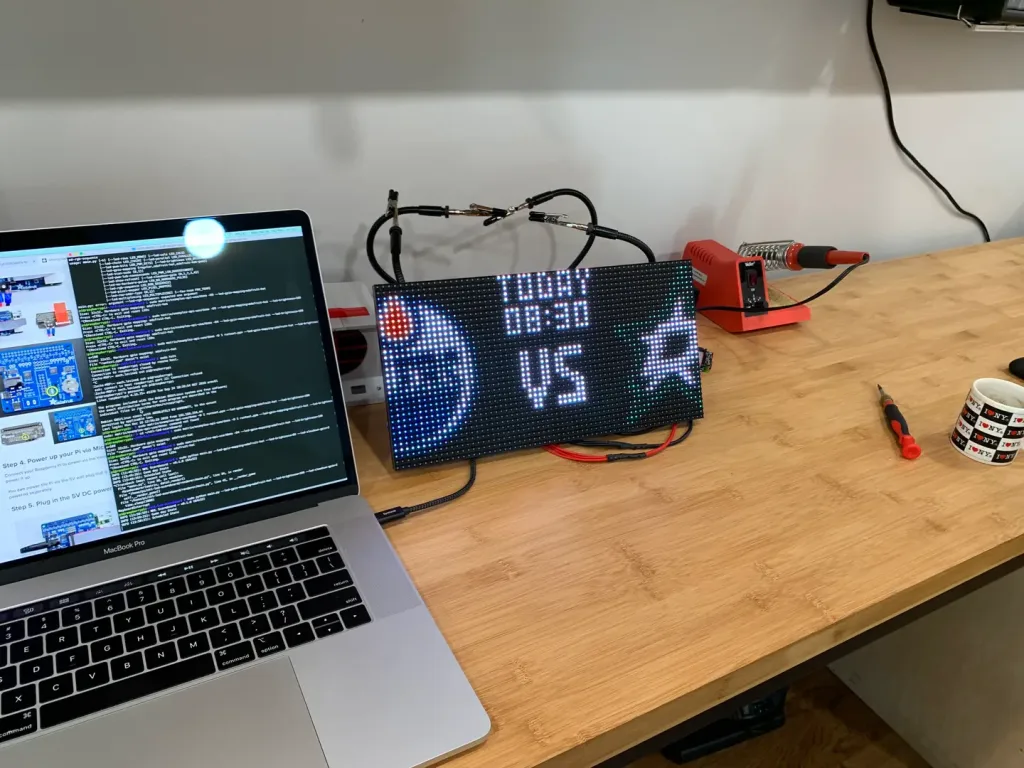
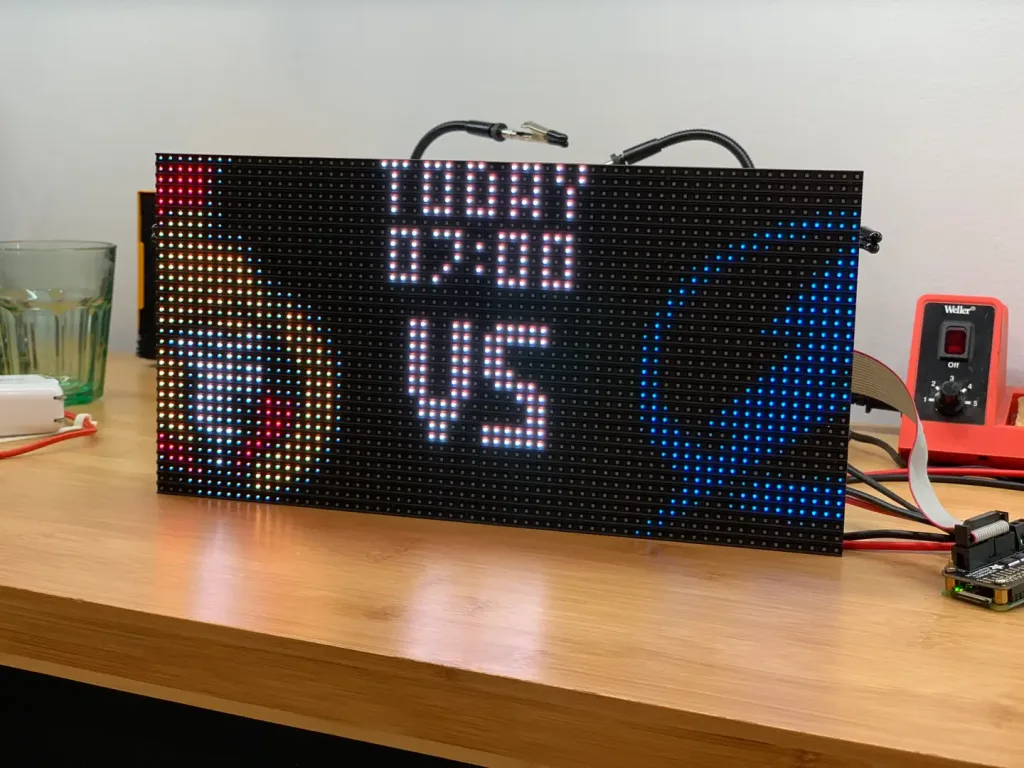
1 – First, a final photo
When your team is playing, the scoreboard automatically displays up-to-the-minute game stats including period, score, and game clock.
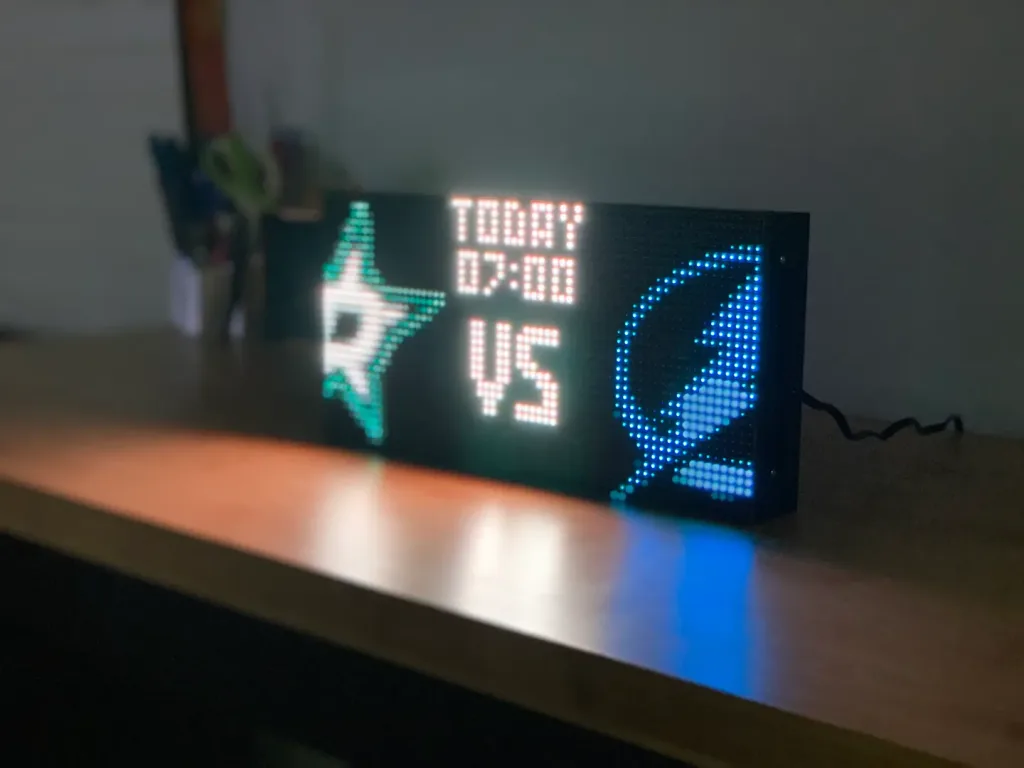
2 – Pregame info
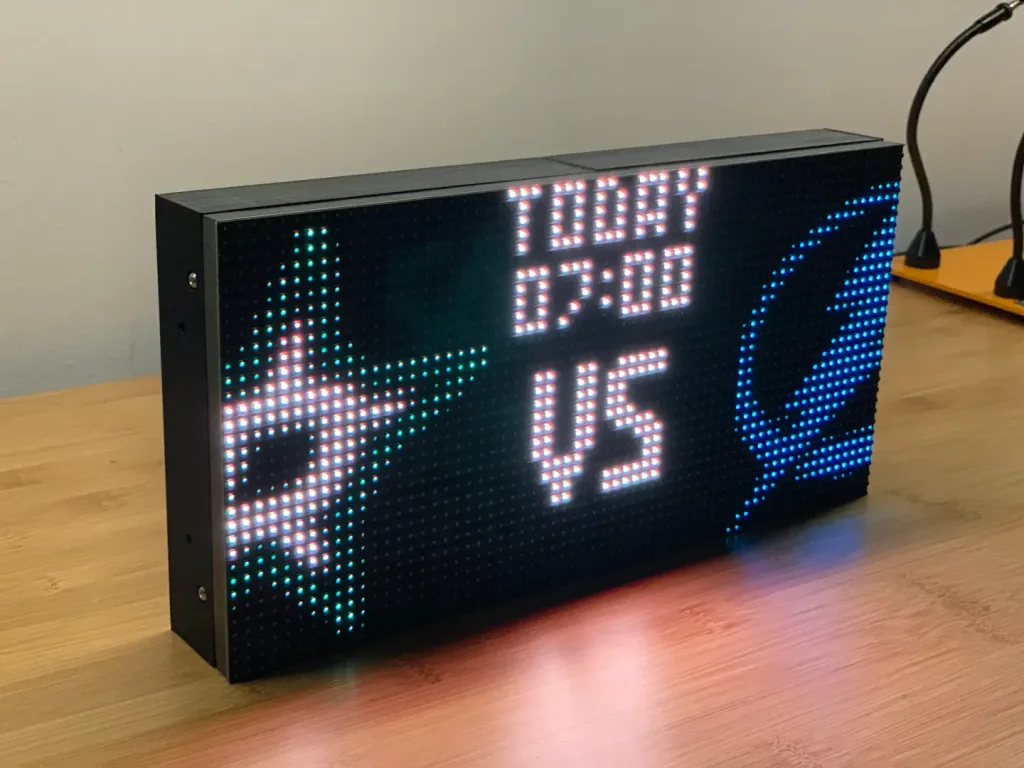
On gameday, the scoreboard will show the upcoming matchup as well as the game time. On days when there is no game, a customizable message is shown. In the future, I’d like to modify this to display a clock and local weather data.
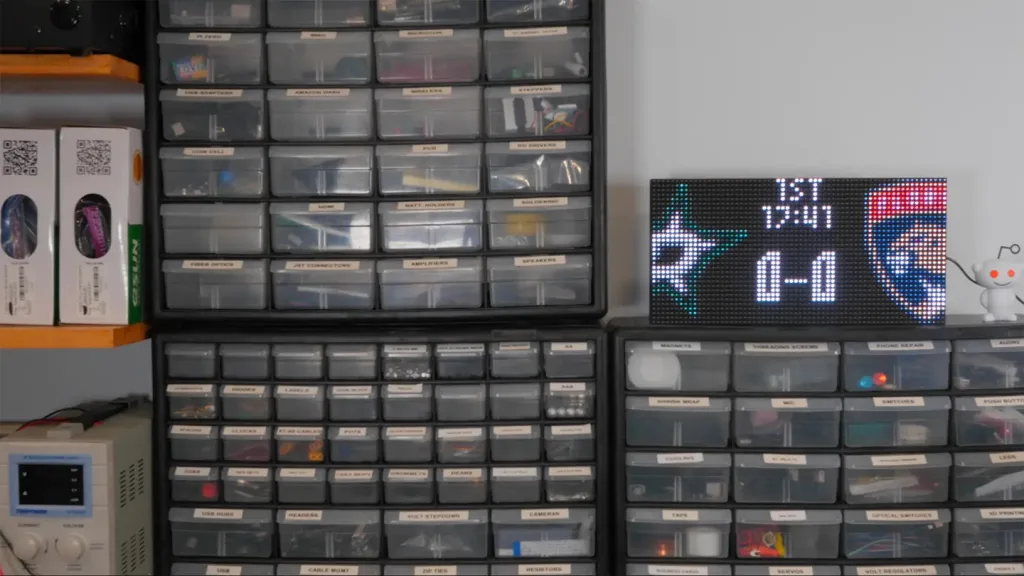
3 – Postgame info

The scoreboard even shows post-game data for the previous game.
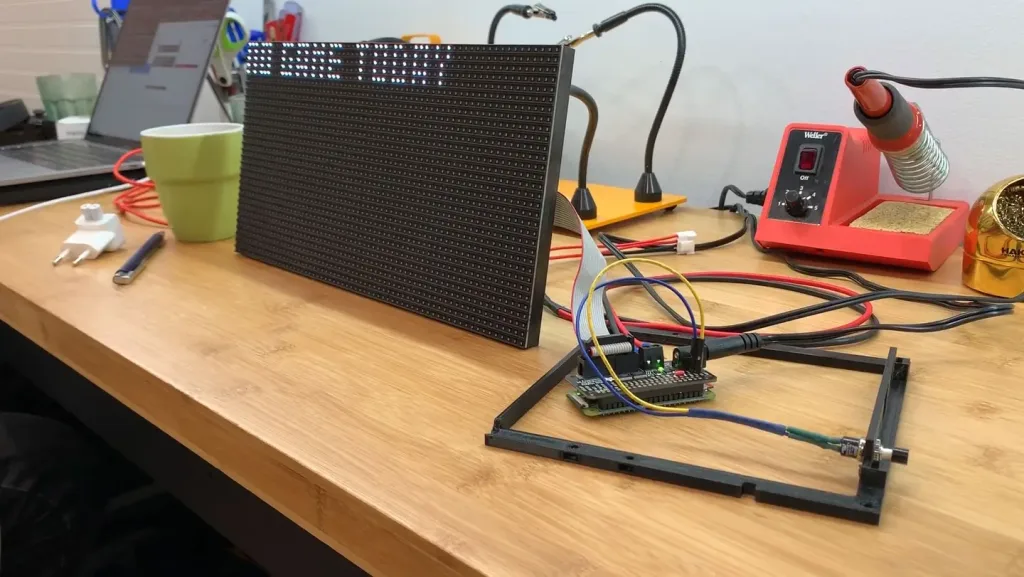
4 – Gather your materials
For this project, you’ll need a Raspberry Pi, LED panel, and a few other things.
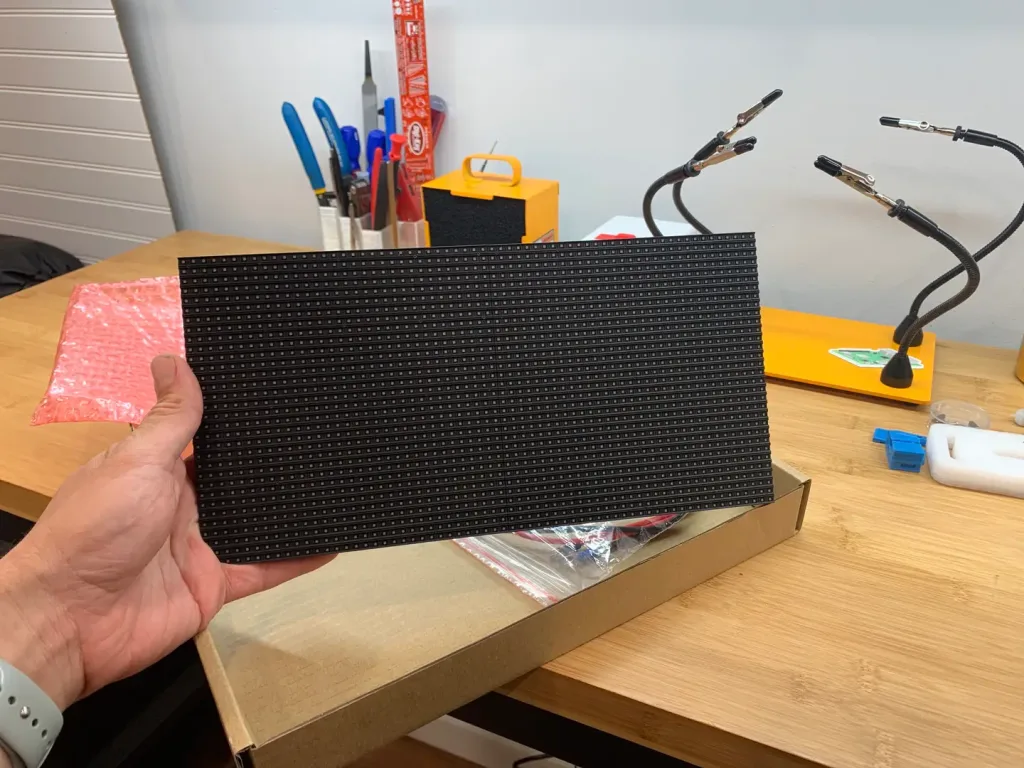
LED panel
I chose the large 64×32 RGB LED matrix from Adafruit. This panel features a 5mm pitch, meaning the LEDs are spaced 5mm apart. You can also use a smaller display; for example, a 64×32 LED panel with a 3mm pitch is physically smaller (and thus has a higher resolution) than one with a 5mm pitch. Adafruit makes 3mm, 4mm, 5mm, and 6mm pitch panels in the 64×32 variant. You’ll also need this amply power supply to run your panel.
If you’d like to save money, you can certainly order a cheaper panel elsewhere but I prefer Adafruit displays because they’re known for quality.
Raspberry Pi
Although any Raspberry Pi model will work, I chose the Raspberry Pi Zero WH since it’s small and inexpensive. If you don’t have a soldering iron, be sure to pick up the Zero W_H_ (With Header), which comes with the header pre-soldered. This RGB matrix bonnet fits onto the Raspberry Pi and allows it to easily control the LED panel.
Housing
I 3D printed a housing for my panel; the housing is totally optional in case you don’t have access to a 3D printer. The panel comes with magnetic feet in case you want to simply stick it somewhere or prop it up on your shelf.
Project cost
The total cost for this project is around $100-125, assuming you use the nice Adafruit panel I did.
5 – Install Raspbian
Insert the micro SD card into your computer. Then, download and install Raspbian Buster Lite from the Raspbian downloads page.

Be sure to download the Lite version of Raspbian. The GUI in the “full” version of Raspbian uses too many system resources; we need these precious resources to drive our panel, especially on the tiny Zero W.
Next, set up WiFi and enable SSH. When you’re done, eject the micro SD card from your computer and put it into the Raspberry Pi.

How to Set up WiFi on Your Raspberry Pi Without a Monitor (Headless)
No monitor, keyboard, or mouse? No problem.
6 – Wire everything up
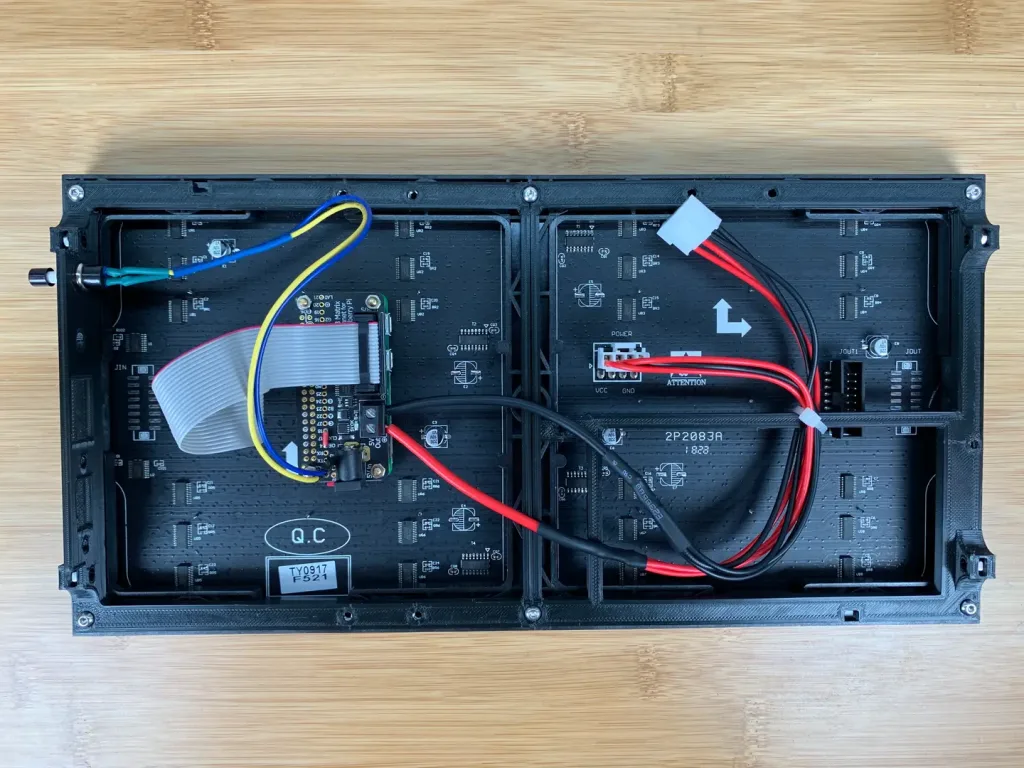
Slide the RGB bonnet onto your Raspberry Pi’s GPIO header. I used a few standoffs from a small kit I bought on Amazon, but these are optional.
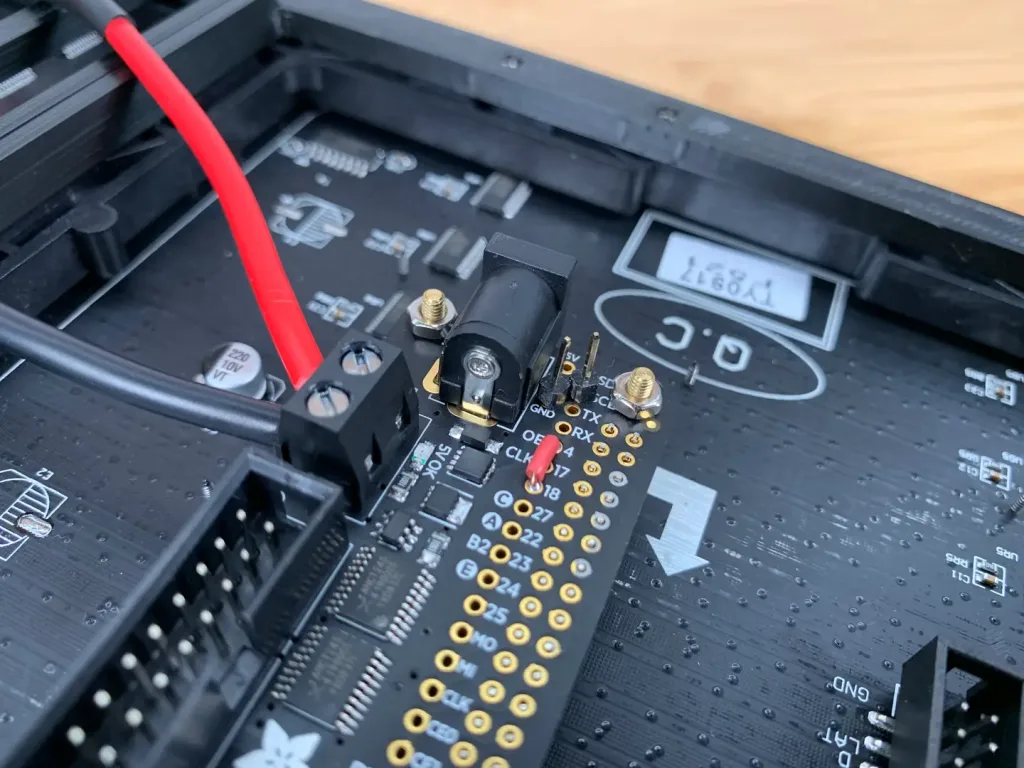
Next, connect the gray ribbon cable between the bonnet and the panel’s JIN1 port.
The panel came with a Y-cable with two white connectors on one end and two “pitchfork” connectors on the other. Connect one of the white connectors to the back of the panel. Then, use a small flathead screwdriver to connect:
- The red wire’s pitchfork connector to the positive (+) terminal on the bonnet
- The black wire’s pitchfork connector to the negative (-) terminal on the bonnet
Finally, connect the power supply to the bonnet. The power supply will power both the Raspberry Pi and LED display. Your Raspberry Pi will now boot.
| 🛈 If you have a pair of strippers available, I recommend cutting off the pitchfork connectors, twisting each wire, and then inserting each wire into the terminal block instead. This way you don’t have a “live” side of each pitchfork connector sticking out that could short against something. This is optional but recommended. |
7 – Install the software
Next, we’ll install the nhl-led-scoreboard library. This library will retrieve game data from the Unofficial NHL API and display it on the screen. A special thanks to riffnshred on GitHub for putting this together (and for approving my pull requests)! 🙂
I’ll outline these instructions briefly below, but since these instructions can change, I recommend reading through and following the instructions in the README file on GitHub to check for changes.
Connect to your Raspberry Pi via SSH. After logging in, I recommend changing the Pi’s default password and, if you have multiple Pis in the house, changing the Pi’s hostname. I changed my hostname to scoreboard so now I log in using ssh pi@scoreboard.
Update the Pi and install Git
sudo apt-get update
sudo apt-get install git python-pip
Install the library and dependencies
git clone --recursive https://github.com/riffnshred/nhl-led-scoreboard
cd nhl-led-scoreboard/
sudo chmod +x install.sh
sudo ./install.sh
Set your favorite team
sudo nano config.jsonGrab your favorite team’s ID from the table below and populate it after fav_team_id:
{
    "end_of_day": "12:00",
    "debug": false,
    "fav_team_id": 14
}| Team | ID | Team | ID | |
|---|---|---|---|---|
| Anaheim Ducks | 24 | Nashville Predators | 18 | |
| Arizona Coyotes | 53 | New Jersey Devils | 1 | |
| Boston Bruins | 6 | New York Islanders | 2 | |
| Buffalo Sabres | 7 | New York Rangers | 3 | |
| Calgary Flames | 20 | Ottawa Senators | 9 | |
| Carolina Hurricanes | 12 | Philadelphia Flyers | 4 | |
| Chicago Blackhawks | 16 | Pittsburgh Penguins | 5 | |
| Colorado Avalanche | 21 | San Jose Sharks | 28 | |
| Columbus Blue Jackets | 29 | St Louis Blues | 19 | |
| Dallas Stars | 25 | Tampa Bay Lightning | 14 | |
| Detroit Red Wings | 17 | Toronto Maple Leafs | 10 | |
| Edmonton Oilers | 22 | Vancouver Canucks | 23 | |
| Florida Panthers | 13 | Vegas Golden Knights | 54 | |
| Los Angeles Kings | 26 | Washington Capitals | 15 | |
| Minnesota Wild | 30 | Winnipeg Jets | 52 | |
| Montreal Canadiens | 8 |
Then, save and exit.
8 – Set your timezone
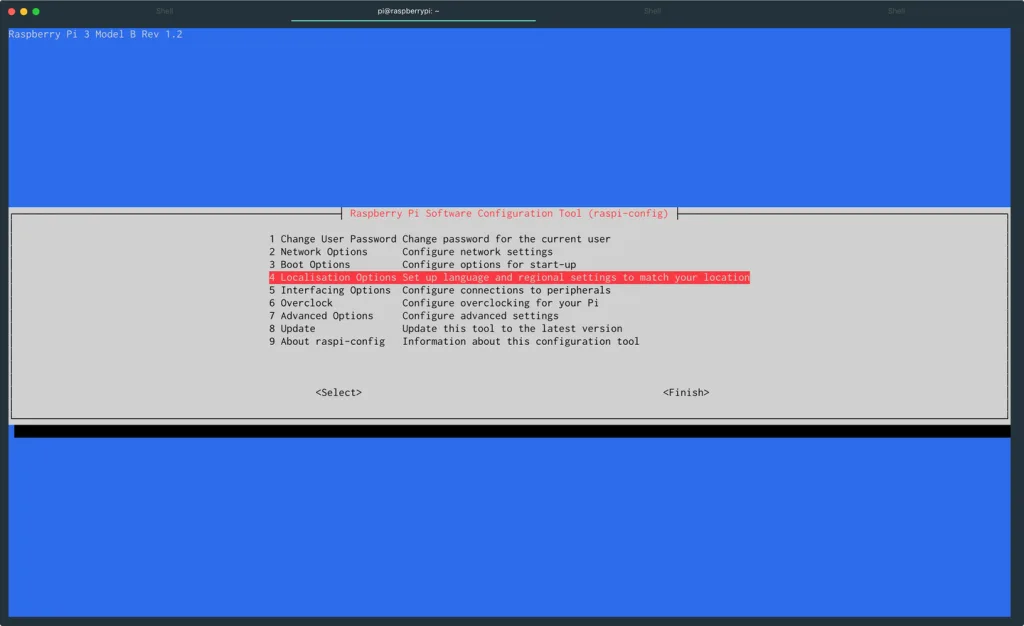
Since the display will show the start time for an upcoming game, you’ll need to change your Pi timezone. Otherwise, the game start time will be based on the timezone where the Raspberry Pi is manufactured (the UK).
You’ll be prompted to restart after saving your configuration changes.
9 – Test
To test your display, run the following command:
sudo python main.py --led-gpio-mapping=adafruit-hat --led-brightness=60 --led-slowdown-gpio=2You can adjust the brightness to your liking; enter a percentage value from 1 to 100. For example, this outputs full (100%) brightness:
sudo python main.py --led-gpio-mapping=adafruit-hat --led-brightness=100 --led-slowdown-gpio=2It would be cool to add a potentiometer to the display in the future to adjust brightness on the fly.
The display should now show today’s game data or a message stating there’s no game today. For additional LED panel configuration options, check out the rpi-rgb-led-matrix library that this project uses under the hood.
10 – Optional: Anti-flicker mod
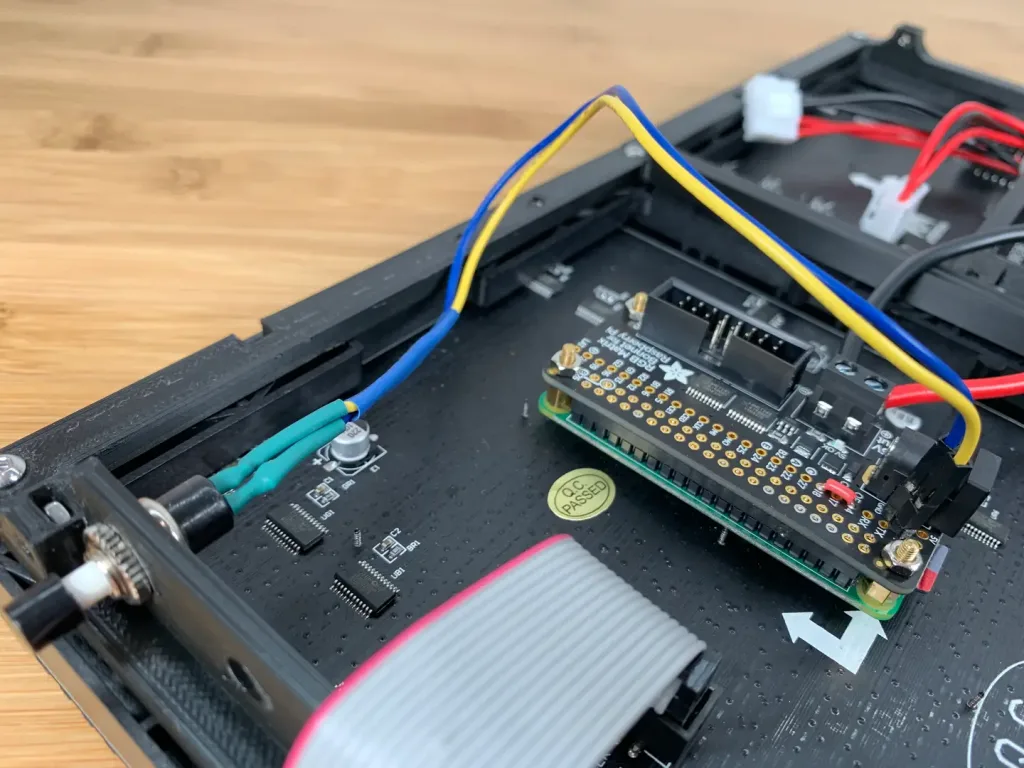
By default, a bit of flickering can occur due to the way the Pi draws the screen; to prevent this, simply solder a small jumper wire between pins 4 and 18 on the bonnet. This easy mod tells the bonnet to use PWM to draw the display, resulting in 0 flicker.
After doing this, you’ll use this alternate command to launch the script:
sudo python main.py --led-gpio-mapping=adafruit-hat-pwm --led-brightness=60 --led-slowdown-gpio=2Notice that the --led-gpio-mapping flag is now set to adafruit-hat-pwm instead of adafruit-hat.
11 – Start the script at launch
Next, we’ll want to make sure the scoreboard launches automatically when our Pi boots up and our network device is available. I wrote a separate guide on using Raspberry Pi crontab but here’s a recap:

Crontab: How to Run a Simple Command When Your Raspberry Pi Boots
A simple method for running commands automatically on boot.
Create our startup script (thanks Tyler!):
nano ~/start-scoreboard.shPaste the following:
#!/bin/bash
cd /home/pi/nhl-led-scoreboard
n=0
until [ $n -ge 10 ]
do
   python main.py --led-gpio-mapping=adafruit-hat --led-brightness=60 --led-slowdown-gpio=2 && break
   # Uncomment and use this line instead if you did the anti-flicker mod:
   #python main.py --led-gpio-mapping=adafruit-hat-pwm --led-brightness=60 --led-slowdown-gpio=2 && break
   n=$[$n+1]
   sleep 10
done
Then, save and exit by pressing CTRL-X, then Y, and then Enter.
Next, make it executable:
chmod +x ~/start-scoreboard.shNext, run the script on boot:
sudo crontab -eAdd the following command to the bottom:
@reboot /home/pi/start-scoreboard.sh > /home/pi/cron.log 2>&1Save and exit. Finally, test your change by rebooting your Pi:
sudo rebootYour scoreboard should now light up after your Pi boots! If it doesn’t, you can check cron.log for errors by running cat ~/cron.log.
| 🛈 You can uncomment a line by removing the # at the beginning. |
12 – Optional: 3D print the LED panel housing

If you’d like to add a housing to your scoreboard and have access to a 3D printer, print this amazing model. You’ll only need to print the following parts from that model:
raspberry_pi_zero_w_sled_alternate_version.stlcover_rpi_side.stlcover_battery_side.stlp5_panel_frame_rpi_side.stlp5_panel_frame_battery_side.stl
I printed the housing on my Creality Ender 3. If you’re thinking about getting a 3D printer, I highly recommend it.

Creality Ender 3 Review: The Best 3D Printer Under $200
Behold the Anet A8 slayer.
Panel assembly
Assemble the various panel pieces using M3x8mm bolts and nuts, which you can find on Amazon or at your local hardware store. For detailed assembly instructions, check out this great tutorial written by the model creator.
If the Raspberry Pi sled doesn’t fit your screen, you can use a bit of foam tape to secure the Pi to the back of your panel.
If you used a different-sized LED panel (like a 3mm or 4mm pitch panel), you can search Thingiverse for housings that fit your panel. The overall dimensions of the different “pitch” panels are completely different.
| 🛈 When searching for models, you might need to search “P3” instead of “3mm pitch”; apparently this is standard terminology. I wasted way too much time searching before figuring that out. |
13 – Add a power button
I added a power button to shut the Pi down safely and boot it up using this Pi power button guide. This is optional but recommended; you always want to shut the Pi down safely to prevent data corruption.

How to Add a Power Button to Your Raspberry Pi
Because you should always safely shut down your Pi.
Follow that guide to add your own power button; since the bonnet covers the Raspberry Pi’s GPIO header, simply solder the wires (or two pins) to the SCL and GND pins on the bonnet instead.
The button itself lives in the opening on the side of the panel housing.
14 – Display it proudly!
This was a very fun, very easy project and a great foray into driving LED panels using a Raspberry Pi. Place your scoreboard on a shelf, give it to a friend, or set it on your desk and never miss another game.
15 – Future plans
There are a few things I have planned in the immediate future:
Real-time clock countdown functionality
One thing this project is missing is a game clock that counts down in real-time; since it retrieves game data every minute or so, it displays the current time remaining in a static format; it would be great to modify the code to count down in seconds until the next retrieval.
It’s important to note this is a new open-source project coded by volunteers; if you’re a developer and want to contribute, I created a GitHub issue for this feature.
Installing MLB scoreboard
Once baseball season starts back up, I plan on installing the MLB-LED-Scoreboard library as well! Then, I’ll use a button to toggle between the different views. But for now, it’s all hockey.
Weather and a clock on off-days
When there’s no game, I’d love to see my local weather; the MLB library has this functionality. It would be cool to show this on the pregame screen as well.
Potentiometer
I’d like to add a potentiometer (knob) to the side of the display to adjust the panel brightness on-the-fly. Maybe even a light sensor. 🙂

How to Add a Raspberry Pi Potentiometer
It’s time to crank your project up to 11.
Other things
This will be an ongoing project that I’ll be improving over time—subscribe to me on YouTube or like Howchoo on Facebook to get notified when I do!
A special thanks
Again, I’d like to thank the following people/groups for ultimately contributing to this project through Open-Source Software (OSS):
- riffnshred for developing the
NHL-LED-Scoreboardlibrary. - The
MLB-LED-Scoreboarddevelopers: Their repo served as the basis for theNHL-LED-Scoreboardlibrary. - TomHammond on Thingiverse for designing and sharing the panel housing.
- The
rpi-rgb-led-matrixdevelopers: Their library helps us control our LED panels so, so easily.
16 – Questions? Comments?
I’d love to hear from you! Post in the comments section below and I’ll do my best to help you out!
Want to keep up with your favorite teams this season? Check out this guide on how to add your favorite sports team’s schedule to your Microsoft Outlook Calendar.