Pi-hole: How to Set Up and Configure Pi-hole on Raspberry Pi

Share
What you'll need
Interests

Posted in these interests:

Bad ads are everywhere you turn on the internet, disrupting the overall user experience. They exist in various forms, from visually-disruptive video ads that take over your browser window, to ads that inject malware onto the page to steal your personal data without you knowing it.
If you want to stop ads like these, you use an ad block: so far, so good. These aren’t available for every device, however, so what about an ad block that works for every single internet-connected device across your network?
Pi-hole is ad-blocking software for the Raspberry Pi single-board computer that can do just that, blocking common ad networks from loading ads on all devices across your network.
To use Pi-hole, you’ll need to first install and set it up on your Raspberry Pi by following the instructions listed here. While these instructions have been written with Raspberry Pi OS (Raspbian) users in mind, they may also work for other Linux distributions and devices.
1 – What is Pi-hole and how does it work?
All internet services use domain name server (DNS) requests to point you from A to B, and advertisements are no different. DNS, for those who don’t know, is how your web browser takes howchoo.com and returns the appropriate IP addresses for the web servers the site is hosted on. In the same way, DNS is used to send requests to ad networks to serve their ads.
When a Google ad loads, your web browser is probably loading up requests from domains like googletagmanager.com to serve them correctly. To stop these ads from loading, you need to intercept them and stop them, which is exactly what Pi-hole is designed to do.
Pi-hole acts as a replacement domain name server for your local network. As the DNS server for your devices, any requests for ad networks are sent through Pi-hole first. It checks these against the thousands of domains in its blocklist. If the domain is blocked, the ads are blocked, giving you the ad-free experience you’re probably looking for.
This is handy for devices that can’t easily use standard ad blocking techniques. You can easily block ads in a web browser using an extension, but it’s impossible to do this on a smart TV or games console without using a service like Pi-hole to do it for you.
Pi-hole is ready-to-go with very little configuration after setting it up, but if you do need to customize it, Pi-hole’s web dashboard lets you whitelist or blacklist certain domains, letting you block unusual ad networks or other suspicious websites from loading.
2 – Options for installing Pi-hole
There are two ways you can install Pi-hole on a Raspberry Pi and, indeed, other Linux platforms like Debian and Ubuntu. If you’re already using Raspberry Pi OS (Raspbian) or another Linux distribution, then you can install it using a single-line script from the terminal.

Alternatively, you can use Docker on your Raspberry Pi to set up Pi-hole in an isolated software container. Either option is fine, but Docker requires more extensive configuration (although it does allow you to run it in isolation).
If you want to install Pi-hole, you can use either method using the instructions below.
3 – Option 1: Installing Pi-Hole using the automated installation script
The quickest way to install Pi-hole is to use the developer’s own installation script. You can run the script from the Pi-hole website using curl, or you can download the script first and run it manually.
To run the script automatically, open a terminal window and type:
sudo curl -sSL https://install.pi-hole.net | bashThis will run the automated installation script for Pi-hole, downloading any necessary packages, as well as letting you set Pi-hole’s configuration before the installation completes.
While this should be safe, it’s generally bad practice to run a script from the internet directly using curl, as you can’t review what the script will do before you run it. If you’re worried about doing this, you can download the script first (allowing you to double-check the code), then run it manually.
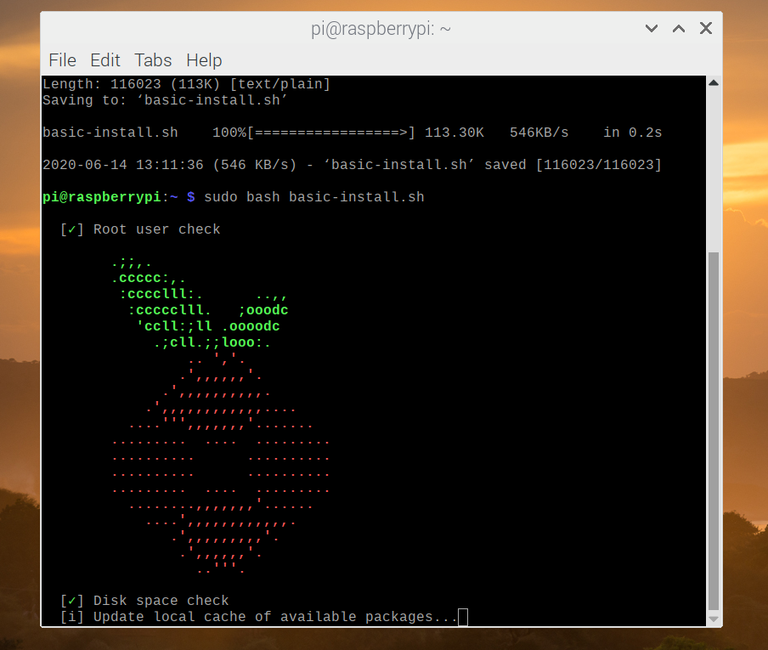
To do this, open a terminal and type the following:
wget -O basic-install.sh https://install.pi-hole.net
sudo bash basic-install.sh
This will then run the same installation script to install Pi-hole and any additional packages before configuration.
Configuring Pi-hole during installation
At some point during the setup process, the terminal window will switch to the configuration options, where you’ll be asked to confirm various Pi-hole settings, such as your network configuration and preferred logging levels.
- Press the enter key to proceed through some of the initial information screens. At the Choose an interface screen, select your Wi-Fi or ethernet connection using your arrow keys, then press space or enter. Use the tab key to switch to the OK option, then hit enter to confirm.
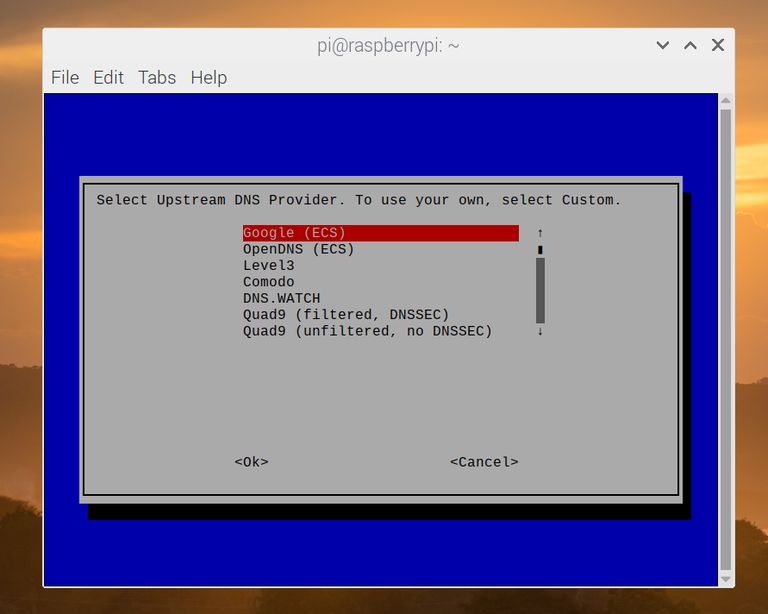
- You’ll then be asked what external DNS server you’d like to use. Cloudflare and Google are good, free options here. Select the provider you wish to use using your arrow keys, then hit the enter key to confirm.
- At the next stage, you’ll be asked what adblocking lists you wish to use. Pi-hole provides four lists by default, and it’s recommended that you leave all of these selected, but you can enable or disable any of these by selecting them and hitting space on your keyboard.
Use the tab key to switch to the OK option, then hit enter to proceed. - By default, Pi-hole will block ads over IPv4 and IPv6 connections. Unless you have any preference to change this, leave the default options selected, press tab to select OK, then hit enter.
- At the next stage, you’ll be asked to confirm whether the IP address and IP gateway (likely to be your local router) shown are correct to use for Pi-hole’s static IP configuration. Hit enter on Yes if this is correct, or No if it isn’t to change your settings.
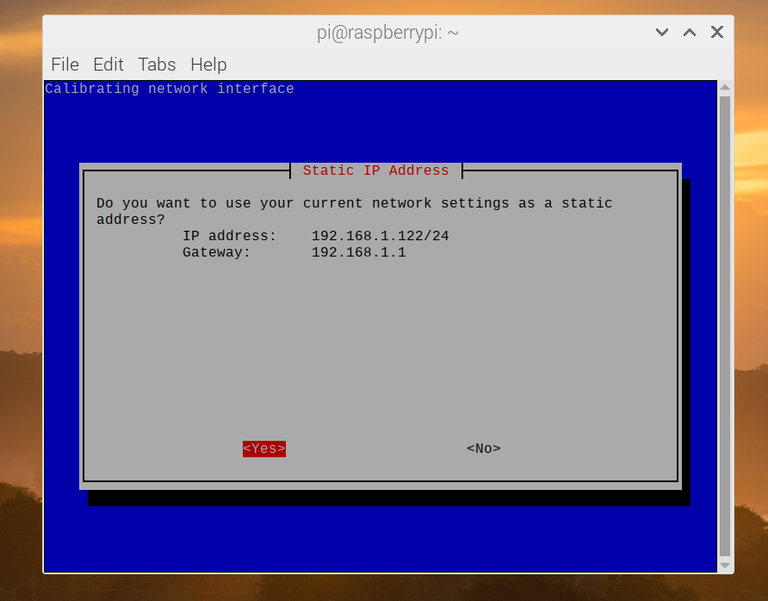
- Pi-hole will warn you about potential IP conflicts. Hit the enter key to accept this warning and proceed.
- By default, Pi-hole will come with an admin portal for your web browser that you can use to configure and monitor it. This is selected for installation by default, which is the recommended option here. Hit tab, then enter on the OK option to proceed. You’ll also need to do this at the next stage to confirm the installation of a web server for the admin portal to use.
- Pi-hole will ask you if you want to log queries. This is useful, as you’ll be able to see what Pi-hole is blocking and how often those domains are blocked. This is selected by default, so hit tab and enter to confirm.
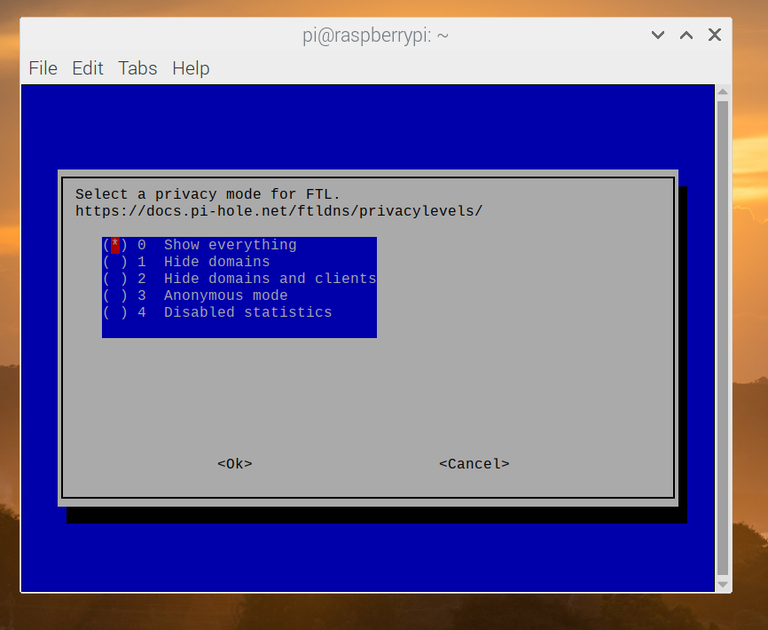
- You can select how detailed you’d like your Pi-hole statistics to be. There are five levels, which you can view in detail in Pi-hole’s documentation. The default option is to show everything, so hit tab and enter to confirm if you’re happy with this.
Once you’ve selected your preferred logging level, the Pi-hole installation will continue. A final confirmation message will appear in the terminal once the installation is completed, providing you with information on how to access the web portal, as well as your auto-generated password for signing in. Hit tab, then enter to end the installation at this point.
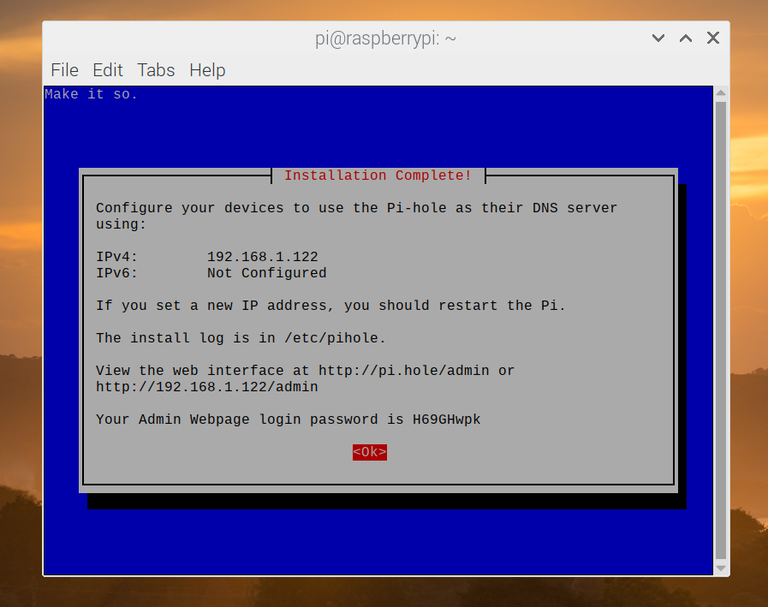
Important: You won’t be able to recover the auto-generated admin password shown at the end of the installation process. If you forget or lose your password, you’ll need to open a terminal and type sudo pihole -a -p to reset it.
4 – Option 2: Installing Pi-hole as a Docker container
If you prefer, you can choose to use Docker to run Pi-hole in an isolated Docker software container, rather than installing it using the script shown above.
You’ll need to install Docker on your Raspberry Pi before you can do this, however.

Installing Docker
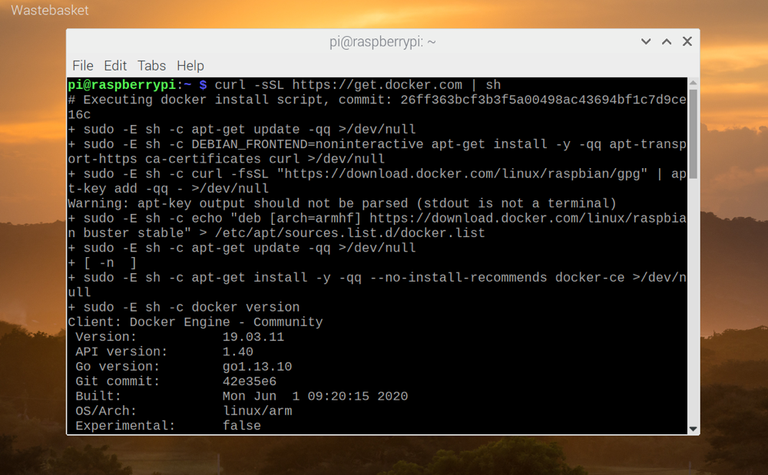
- If Docker isn’t installed, you can quickly install it on your Raspberry Pi by opening a terminal window and typing:
curl -fsSL https://get.docker.com -o get-docker.shsh get-docker.sh - Alternatively, you can install Docker by downloading the script first and installing it manually by opening a terminal and typing:
wget -O install-docker.sh https://get.docker.comsh install-docker.sh - Once the Docker installation is complete, you’ll need to run the command
sudo usermod -aG docker pito allow Docker to be run by non-root users (such as the default pi user on Raspberry Pi OS). - You’ll also need to type
sudo systemctl enable dockerto make sure that Docker automatically starts when your Raspberry Pi reboots.
Setting up Pi-hole as a Docker container
To run Pi-hole in a Docker container, you’ll need to first grab a copy of the Pi-hole Docker installation files by cloning the Pi-hole Github repository (you’ll need Git installed first).

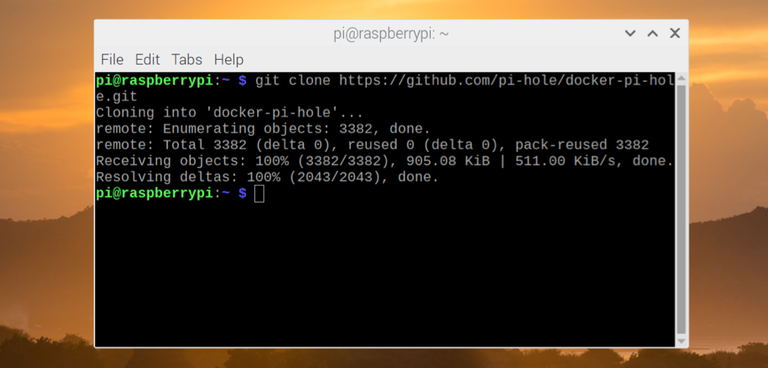
- Type the following in a terminal window (or remote SSH connection) to do this:
git clone https://github.com/pi-hole/docker-pi-hole.git
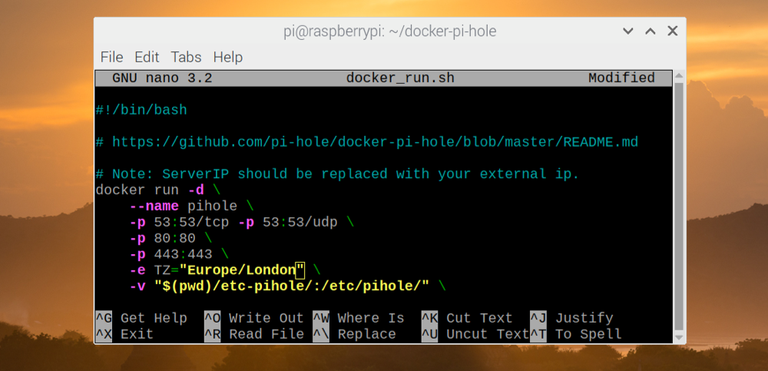
This will pull the latest files to run Pi-hole as a Docker container from the Pi-hole Github repository. A startup script for your container (docker_run.sh) is available in the cloned Pi-hole folder. You may wish to view and edit some of the settings in this startup script before you run it. - By default, the script will generate an administrator password for Pi-hole automatically, set the default outgoing DNS server for Pihole as 1.1.1.1 or 8.8.8.8, and set other settings such as the timezone Pi-hole uses. For instance, if you don’t live in the United States, you may wish to change the TZ field to match your time zone, using an equivalent tz database timezone value (for instance, Europe/London for the United Kingdom).
- You can edit these settings by typing
nano docker_run.shand making changes accordingly.
- Once you’re ready to run the script, type
./docker_run.shat the terminal. If the script is successful, Pi-hole should launch inside a new Docker container at this point.

How to Connect to a Raspberry Pi Remotely via SSH
The preferred (and most common) method of connecting to your Pi to run commands.
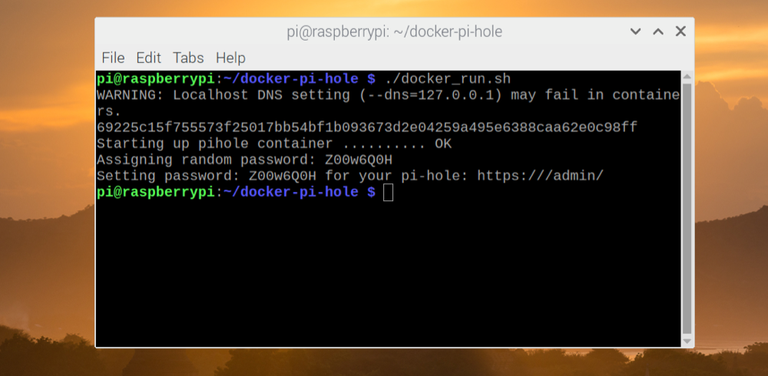
Important: Make sure you note the password that appears in the terminal output after the script successfully runs. This is the password you’ll need to use to be able to configure Pi-hole further.
As the –restart=unless-stopped flag is used in Pi-hole’s Docker startup script, Pi-hole should start automatically if your Raspberry Pi is forced to reboot.
This will only work, however, if you’ve followed the steps above to enable the Docker systemd init script (sudo systemctl enable docker) to ensure that Docker launches automatically on startup.
5 – Configuring individual devices to use Pi-hole
Pi-hole should be running at this point, so the next step for you is to set up your devices to use Pi-hole. Pi-hole can’t block ads across your network by default — you have to set them up to use it by changing your device DNS settings to use your Raspberry Pi’s IP address instead.

You can do this for each individual device manually, or configure your network router to use Pi-hole as the DNS server for your entire network. If you want to configure individual devices to use Pi-hole manually, you’ll need to follow these steps.
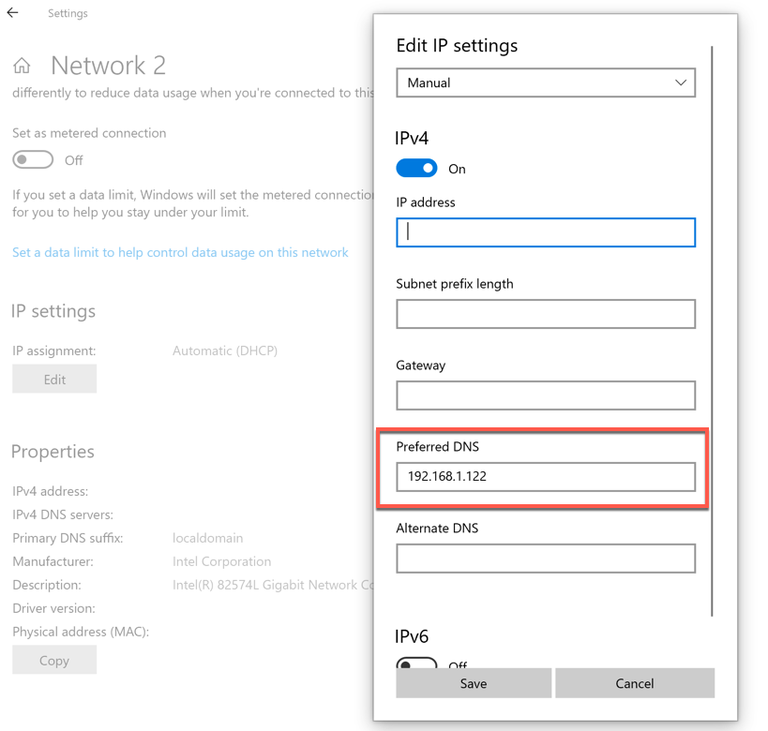
- Windows 10: You can access your DNS settings in the Network Connections area of the Windows settings menu. In the Status tab, click Change connection properties, then take note of the information (including your current IP address) under the Properties section. Click Edit under IP settings, set your IP settings to manual, tap the slider next to IPv4, then set your IP address and other details to match the details previously shown under Properties.
For the Preferred DNS section, add your Pi-hole IP address before saving.
- macOS: You can change DNS settings in macOS by entering System Preferences > Network > Advanced. Under the DNS tab, press the + icon to add your Pi-hole IP address before saving.
- iOS and iPadOS: You can access DNS settings by entering Settings > Wi-Fi and tapping the icon next to your Wi-Fi connection. Tap Configure DNS, select Manual, then remove any existing DNS servers from the list. Press Add server, add your Pi-hole IP address, then tap Save to save your settings.
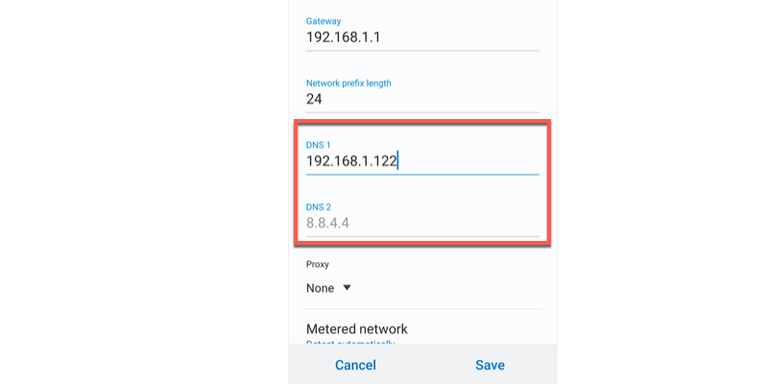
- Android: Android users can also change DNS settings by entering your device settings, but these steps will vary significantly depending on your device and Android version. In the Wi-Fi or Connections section (depending on your device version), select your connection and click Advanced (or similar). You may need to set your IP address settings to Static rather than DHCP to allow you to set DNS servers manually. From here, add your Pi-hole IP address as the DNS server before saving.
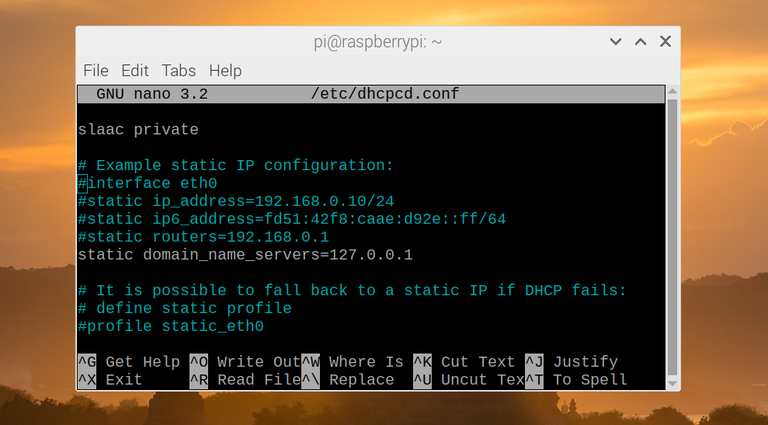
- Linux / Raspberry Pi OS: Changing DNS settings on a device running Linux will vary. For Raspberry Pi OS (Raspbian) users, open a terminal window and type
sudo nano /etc/dhcpcd.conf, addstatic domain\_name\_servers=x.x.x.x(replacingx.x.x.xwith the IP address of your Pi-hole server), then press Ctrl + X followed by Y to save. If you want to block ads on the same Raspberry Pi that runs Pi-hole, replacex.x.x.xwith127.0.0.1instead. You may need to restart your device afterwards.
- Other devices: Consult the manual for your device to determine the correct steps to change network settings for other types of devices like a smart TV, or use the steps below to configure your router to use Pi-hole instead.
Once your devices are set to use your Raspberry Pi’s IP address, you should start to see web queries from it in your Pi-hole admin portal. If you want to be sure Pi-hole is blocking ads, try to access a site that you know runs ads, such as Forbes, or open an ad-supported app.
If the ads are blocked, Pi-hole should be working correctly. You may need to restart your device in some instances for the changes to your DNS settings to take effect, however.
6 – Configuring your router to use Pi-hole as a DNS server for all local network devices
Configuring all of the devices on your local network to use Pi-hole is time consuming and not the most efficient method, especially if you’re looking to use Pi-hole on multiple devices across your network.
If this is the case, it’s better to change your router’s DNS settings to use your Raspberry Pi’s IP address instead. This will mean that all of the devices connected to your local network are protected against ads. This is quicker than the manual method, where you’ll be forced to configure the DNS settings on each device.
Changing your DNS server settings will vary, depending on the make and model of your router. You should be able to find your router’s default IP address (as well as the admin username and password) printed on your router itself, or as part of the supplied packaging.
If not, check your router’s manual and try some common IP addresses such as http://192.168.1.1 or http://192.168.0.1 from a web browser to access your router.
Your router will usually be set to use the DNS servers provided by your internet service provider. Make sure to change your DNS server settings (possibly labelled primary/secondary DNS) to match the IP address of your Raspberry Pi.
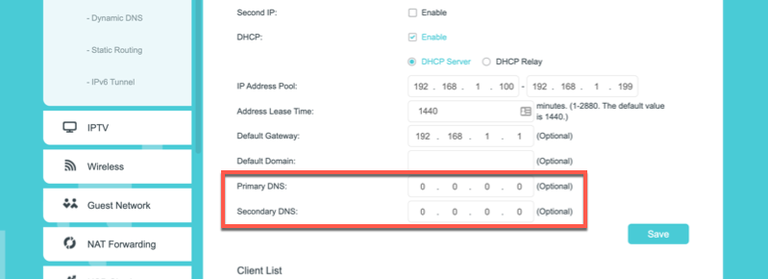
This will instruct all connected devices to route all DNS requests through Pi-hole in the first instance. Any blocked requests won’t be processed, while authorized requests will pass through to the third-party internet DNS provider set up in your Pi-hole configuration (such as Cloudflare’s 1.1.1.1 or Google’s 8.8.8.8 public DNS servers).
Your router may require a reboot for any DNS server settings you change to fully take effect across your network.
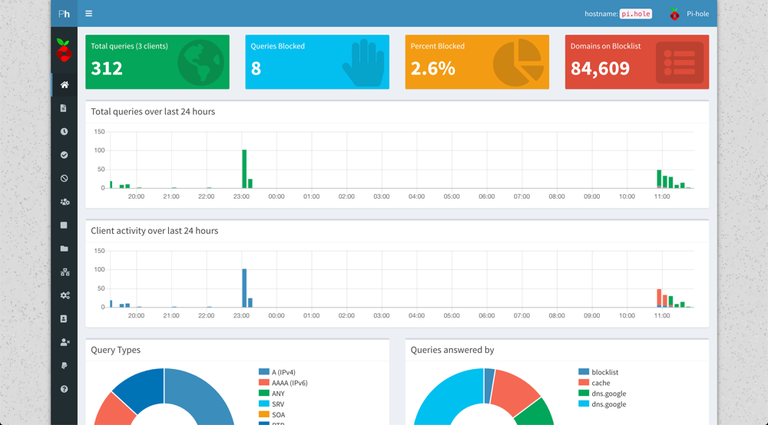
7 – Using the Pi-hole admin portal for additional configuration
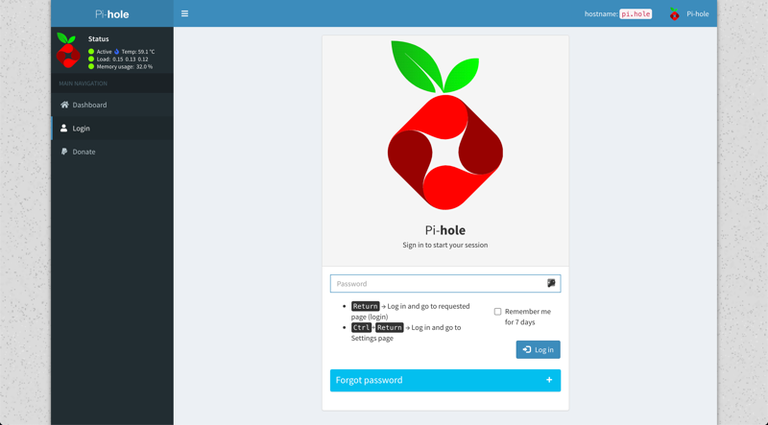
Once Pi-hole is running, you can access the Pi-hole admin portal on your local network by typing http://pi.hole/admin from any web browser. If that doesn’t work, you’ll need to find your Raspberry Pi’s IP address and use that instead (for example, http://192.168.1.10/admin).
This should bring up Pi-hole’s admin portal page, where a brief set of statistics is available for users who don’t sign in. Pi-hole is a run-and-forget system that doesn’t require much in the way of additional configuration, but if you do need to change any settings, you’ll need to do it here.
To access the Pi-hole admin portal in full, click Login in the left-hand menu. You’ll need to use the password you created during the Pi-hole installation process to sign in here.
If you forget the Pi-hole administration password at any point, open a terminal window or remote SSH connection and type sudo pihole -a -p (if you’re running Pi-hole directly) or docker exec -it pihole pihole -a -p (if you’re running Pi-hole in a Docker container) to reset it.

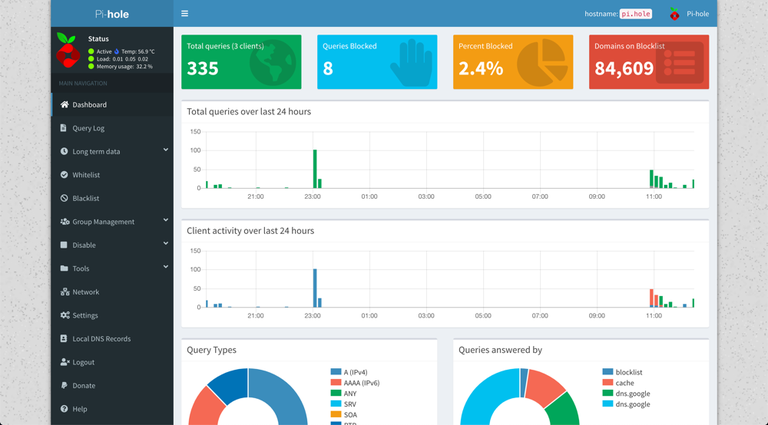
Once you’ve signed in, you’ll be able to see a full list of features, statistics, and logs for Pi-hole.
The left-hand menu gives you access to the various sections of the admin portal, including the main Pi-hole log (listed under Query log), the blacklists and whitelists menus, and the main settings area.
Pi-hole uses a selection of online adlists that are maintained and updated regularly by volunteers and businesses to block many of the most common ad networks.
You can view these by clicking Group Management > Adlists in the left-hand menu, where you can disable or remove any of the existing lists, or add your own.
You can also add or delete specific domains to block (or unblock) in the Blacklist and Whitelist menus. Both menus are largely identical — add a domain name and description, then click Add to Blacklist or Add to Whitelist to add it.
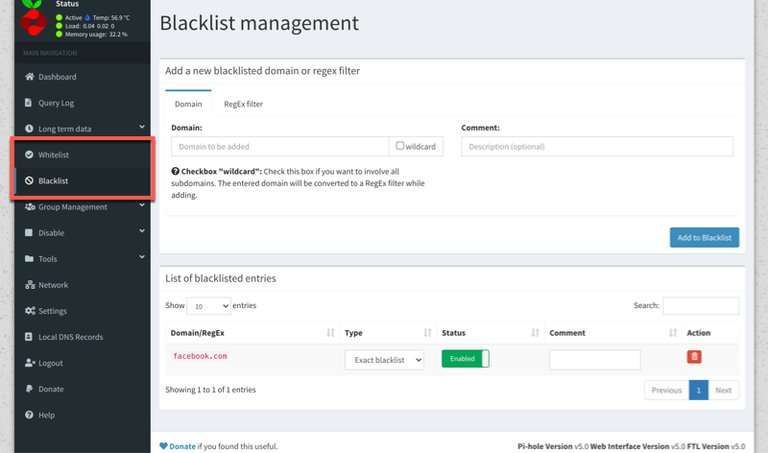
For any entries you wish to remove, press the red trash icon next to the item in the List of entries section below.
8 – What to do after configuring Pi-hole
While it’s important to familiarize yourself with Pi-hole’s admin portal should something go wrong, you shouldn’t need to touch it during day-to-day usage. Once your devices are configured, Pi-hole will work in the background to protect and block ad networks and trackers on some or all of your devices, depending on how your devices are configured.
If you’re using Pi-hole in a Docker container, you may be able to use your Raspberry Pi for other projects at the same time, creating a 24/7 server for you to use. For instance, you may decide to create a Raspberry Pi NAS to store your files, or create a Raspberry PI VPN server to stay safe and hide your identity online.

How to Build a Raspberry Pi NAS Using Samba
Your network storage just got bigger!

How to Build Your Own Raspberry Pi VPN
Create your own Raspberry Pi OpenVPN server.


