How to Connect a Light Sensor to the Raspberry Pi
Share
What you'll need
Interests
Posted in these interests:

Today we’re creating our own LDR light sensor circuit on the Raspberry Pi. This circuit can be used in different projects that involve monitoring light levels. We’ll go over everything you need to get started and even share a few project ideas along the way.
What is a light sensor?
A light sensor is a kind of photodiode. These components convert light into energy. The output from a photodiode can be measured and used to trigger specific functions.
In basic terms, these are diodes that detect light and give an output based on the level of light they receive. We can use the output in custom programs and projects.
What can you use a light sensor for?
Light sensors can be used for tons of cool projects! For example, they can trigger night lights or even help you monitor the light levels within a given space.
1 – Update Raspberry Pi OS
We’ll use Raspberry Pi OS for this project. Be sure your copy of Raspberry Pi OS is up to date. For help, visit our guide on how to update Raspberry Pi OS.

How to Install Raspberry Pi OS on Your Raspberry Pi
Get the new official Raspberry Pi OS on your Pi.
Once your Pi is up to date, turn it off.
2 – Build the light sensor circuit
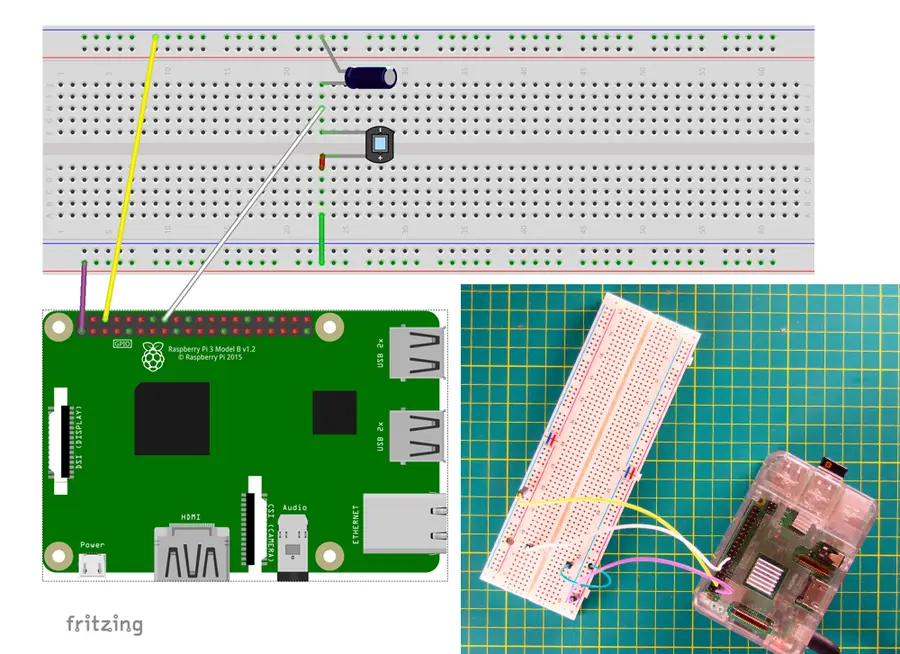
This diagram shows the basic layout for our light sensor circuit. I’m using a breadboard for demonstration purposes, these components can be easily soldered for use in actual projects.
Make the following connections:
- Connect one LDR light sensor leg to the Pi’s 3.3V pin
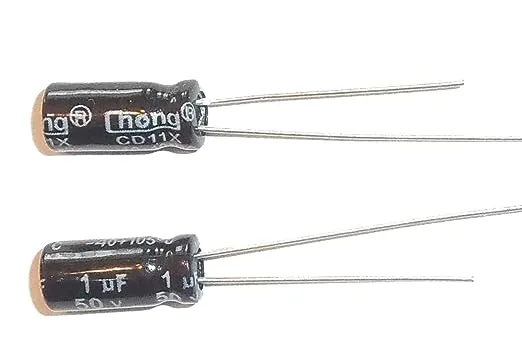
- Connect the other LDR light sensor leg to both the GPIO pin you plan to use and the 1 uF 50v capacitor’s cathode (negative) leg. The cathode leg will be denoted by a series of
---dashes. This GPIO pin will be used in all of your scripts. Take note of the pin you will be using. I’m using physical pin #16 (GPIO 23). - Connect the capacitor’s anode (positive) leg to the Pi’s GND pin
When the circuit is ready, turn the Pi on.
3 – Install the light sensor detection script

We need a script to test our circuit. I recommend this light sensor script created by Emmet Young.
This script is designed to detect the input from the sensor and print out a live feed of information in the terminal based on the readings. Not only does it serve our testing purposes, but it’s also a great demonstration of how the light sensor input can be utilized and manipulated within Python.
Download this file to your PC. Edit the file in a text editor to change the GPIO pin to the correct physical pin number. This script is designed to use the physical pin number on the board — by default, the script uses pin #7. In my diagram above, I’m using physical pin #16. Save the changes.
Transfer that file to your Pi using your favorite method. An easy way is to connect to your Pi using SSH and then downloading the file directly to your Pi:

How to Connect to a Raspberry Pi Remotely via SSH
The preferred (and most common) method of connecting to your Pi to run commands.

How to Transfer Files to the Raspberry Pi
Find the best method for your project.
cd ~
wget https://raw.githubusercontent.com/pimylifeup/Light_Sensor/master/light_sensor.py
4 – Test the light sensor circuit

Open a terminal window and connect to the Pi. To run the test script, enter the following:
python light_sensor.pyIf everything is working, you should see a bunch of numbers printing continuously in the terminal. Try shining a light on the sensor or covering it with your hands to observe the changes!
5 – Use the light sensor in a cool project
Now it’s time for the fun part, to actually use it! With a script like Emmet’s running, your Pi will be constantly checking the sensor for the current light levels. You can use the number it provides to trigger a custom event.
Let’s say you want lights to activate when the sun goes down. You can use a custom Python script to activate lights when the sensor readings reach a certain level.
If you have a garden to care for, use the light sensor to monitor your plants all day. You can use the feed to check for anomalous readings and make sure everything is getting enough sun.
Another idea is to trigger an alarm that only activates after so much sunlight has been detected!
Light sensors are really cool and I’m sure you can come up with more project ideas. Congratulations! Now it’s time to brighten up a few projects with a new light sensor.

