How to Control LEDs with the Raspberry Pi Pico

Share
Interests

LEDs can take your project from trashy to flashy but why waste valuable GPIO pins on something so simple when you could dedicate the control with something like the Raspberry Pi Pico?

Raspberry Pi Pico: Everything You Need to Know to Get Started
Small board, massive potential!
If you’re not familiar with the Pico, it’s the latest (and first) microcontroller from the Raspberry Pi Foundation. It’s about the size of your thumb and costs only $4, making it a viable board for many simple microelectronics projects. It features the new RP2040 chip which can be found on a growing number of boards but today we’re focusing on the Pico module.
There are a few different ways to control LEDs using the Pico. In this guide, I’ll go over the three most common LEDs used:
- The Pico has a built-in LED.
- GPIO pins can be used to control individual LEDs.
- The board can also control LED strips—some of which offer individual LED control.
1 – Set up and use MicroPython
Each of these methods will require the use of MicroPython. This relies on an application called Thonny which must be installed on a Windows, Linux, or Mac machine. We have a guide breaking down how to set up and use MicroPython for the first time.

How to Set Up and Use MicroPython on the Raspberry Pi Pico
MicroPython is like Python but teenier.
That said, here’s a quick overview of how it works:
- Download and Install Thonny.
- Connect your Pico to the computer.
- Point Thonny to the Pico using the drop-down menu in the bottom-right corner.
- Enter your MicroPython code into the top half of the Thonny window.
- Save the script, be sure to choose the option to store the script on the Pico.
2 – Control the on-board LED
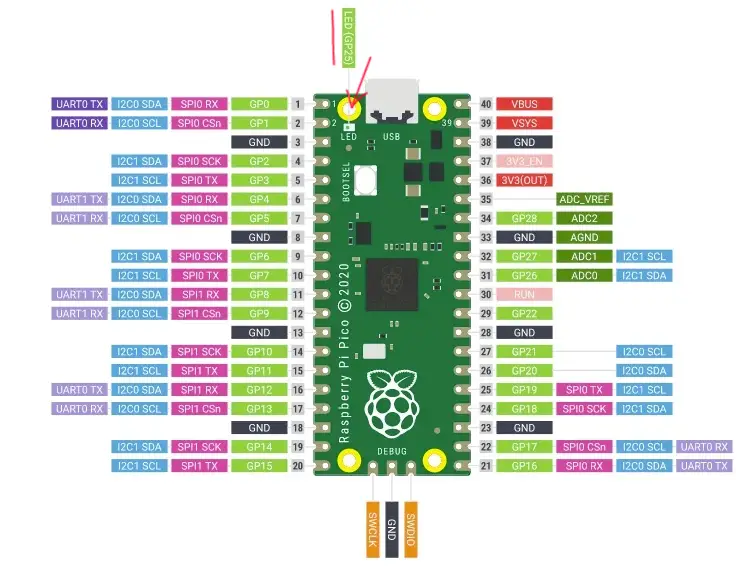
If you need a simple status indicator and don’t want to waste any GPIO pins, you can always use the built-in LED. This component is found on top of the Pico near the mounting button.
Here’s a quick sample script that shows how to call and address the onboard LED. Running this script will turn the LED off or on depending on its current state.
from machine import Pin
led = Pin(25, Pin.OUT)

led.toggle()
You can use this to develop your own code and control the onboard LED. However, you may find this doesn’t suit your project needs. If you need to control different colored LEDs or more than one, you need to use the GPIO pins.
3 – Control a separate LED
Individual LEDs can be easily programmed once wired into place. Single color LEDs will take up fewer GPIO pins than multicolored ones as RGB LEDs require pins for each color it supports in addition to the ground.
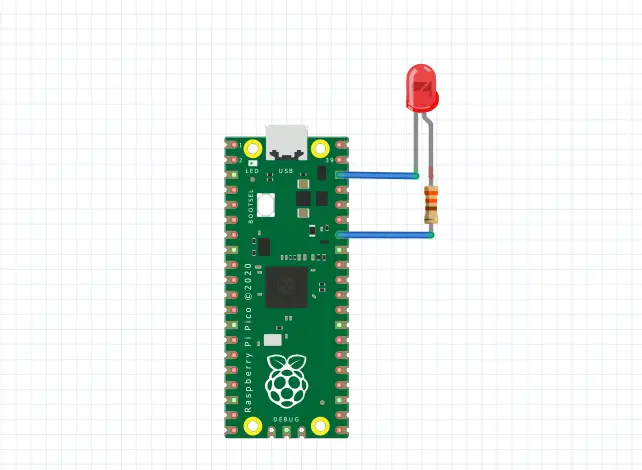
Wire the LED to the Pico
Once you choose what kind of and how many LEDs to use, you’ll need to wire them to the Pico. A resistor is required for the connection—a quick google search will let you know what resistance value is necessary for your LED but 330 ohms is a good rule of thumb.
You can solder the pins into place or use wires to add distance between the Pico and LED. The method you choose depends on what you’re using the LED for. The picture attached shows a general example of how to wire an LED to the Raspberry Pi Pico.
Program the LED
Here’s a sample script that demonstrates how to toggle an external LED. I’m using pin number 34, or GP28, in my sample code. Make sure your code uses the right GPIO pin number that corresponds with your LED.
from machine import Pin
led = Pin(28, Pin.OUT)

led.toggle()
4 – Control a LED strip
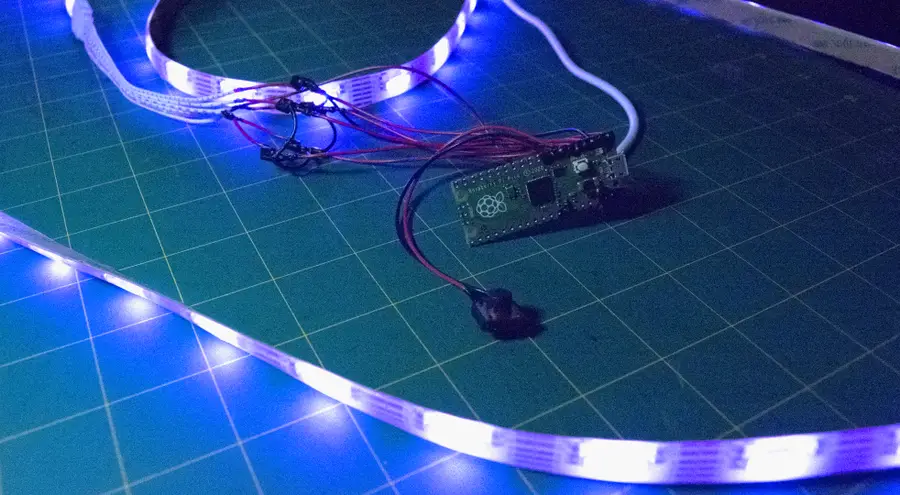
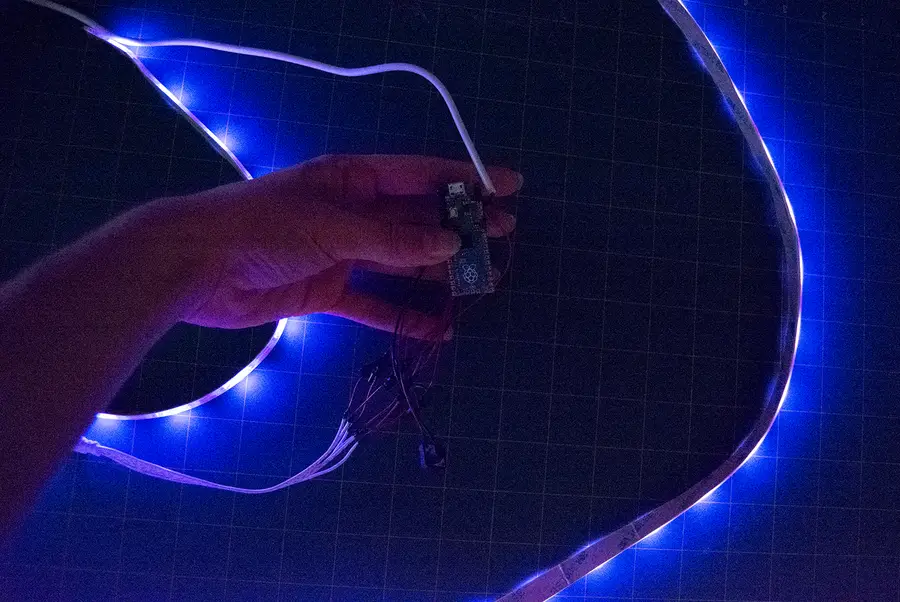
It’s also possible to control a full-sized LED strip. I’m using a random, non-individually addressable strip I found at Walmart. It has RGB colors as well as cool/warm white options, this means that I need 5 open GPIO pins to control each color and one ground pin. A resistor is required for each color but not the ground wire.
Because the LEDs are not individually addressable, the entire strip will illuminate with the same color at the same time. Here’s some example code demonstrating how to set a custom color on the LED strip. The frequency values can be changed for each individual color. The values in this demo will create a soft blue glow. Experimenting with the values will cause colors to mix.
from machine import Pin, PWM

cool_white = PWM(Pin(0))
blue = PWM(Pin(1))
red = PWM(Pin(2))
green = PWM(Pin(3))
warm_white = PWM(Pin(4))

cool_white.freq(500)
blue.freq(10000)
red.freq(500)
green.freq(500)
warm_white.freq(500)
5 – Add your LEDs to a project
You can use these basic principles to incorporate LEDs into a myriad of projects. The Pico adapts easily into projects with Raspberry Pi’s and maintains flexibility at a low cost. At the end of the day, this $4 microcontroller is more than ready to help you build your next flashy project. Congratulations! You’re ready to master LED with the power of the Pico.
And check out some other great Raspberry Pico accessories to give you some ideas too!

Top 10 Raspberry Pi Pico Accessories
You need these goodies!


